
Create a contact group or distribution list in Outlook for PC – Microsoft Support
If you’re always emailing the same group of people, you can create a contact group (previously called a distribution list) that includes all of the recipients by using a previous email that you sent to them. Then, the next time you want to contact them or schedule a meeting with them, you can add the contact group to the To line of your message, instead of adding each person individually.
-
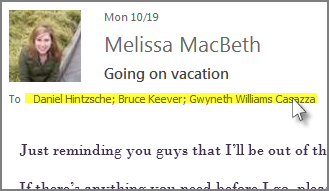
Open an email that was sent to the people you want to include in the contact group.
-
In the To or Cc box, highlight all the names with your mouse.
-
Right-click your selection, and then click Copy, or press Ctrl+C.
-
In the main Outlook window (not in the opened email message), click People on the Navigation bar.

-
Click New Contact Group.

-
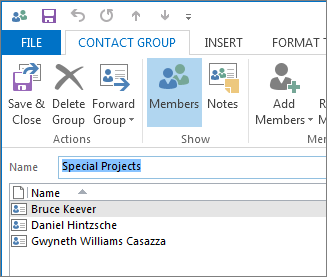
Type a name for your contact group, like Special Projects.
-
Click Add Members > From Outlook Contacts.

-
In the window that opens, right-click inside the Members box, and click Paste, or press Ctrl+V.
-
Click OK.
The people from the email will appear as a list of members for your contact group.
-
Click Save & Close.
Contact groups show up in your list of contacts, along with individual people. You can tell the difference by the icons that appear to the left of the names in List view. The card icon is for individual contacts and the people icon is for contact groups.

Finally, you can always add people or remove people from the contact group later.


