
How to Access Local User and Groups in Windows 11/10 Home Version
Windows systems in offices or cafes are extensively used by several people, and thus the need to manage different accounts and various levels of access to each user. Windows offers a tool— lusrmgr—that allows easy management of users on local and remote machines. However, it is not available for Windows Home users. This post will guide how you can access the Local User and Groups in Windows 11/10 Home version.
Why Is This Tool Not Available in Windows Home Version
LUSRMGR is a console tool in Windows that allows managing users and groups with advanced features. However, this tool is restricted to Windows Pro and Windows Enterprise versions.
Since most of the features are not required for Windows Home users, this tool is not available. This is similar to how Group Policy Editor is not available for Windows Home users but can be enabled.
How to Access Local User and Groups in Windows 11/10 Home Version
Lusrmgr is a console tool to manage local users and groups and is available in all versions of Windows OS except Home. This tool creates and assigns roles to different users available in a Windows System, such as administrator, power user, standard user, guest user, etc.
First, check if lusrmgr is already installed or not in your system.
- Press Windows Key + R to open the Run console.
- Type lusrmgr.msc and press enter.
If you get this error, that means if it is yet not enabled in your device.
To fix this, we will install a third-party tool that will serve the same purpose with exact flexibility as the original lusrmgr console.
- Download the lusrmgr console tool from GitHub
- Keep it somewhere where your files are not deleted. It’s a portable application.
- Double-click to launch, and then use it.

The app requires administrative privileges and a .NET framework to work. Once they are installed, the app will run fine, and you can manage all the users available and create new ones.
Create a new User or Group using the Users and Groups Tab on the left side:
- Select User or Group Tab.
- Right-click on the black space and select the create option.
- Fill in the details and create new users with proper roles and access.
To edit or modify details in already existing users:

- Right-Click on the user, you want to change.
- From here, you can rename, change passwords, assign roles and do a lot more changes to the existing user.
Mục Lục
How to Manage Users in Windows through Settings
If for some reason, you do not wish to install any third-party tool, you can also manage users and groups directly from settings.
I personally do not prefer this due to limited options and flexibility in this method. You will not get as many features and options as in the lusrmgr.msc console.

Manage Users in Windows Home
- Press Windows Key + I to open the Settings
- Navigate to Accounts > Family & other users.
- Select either Add a family member or Add someone else to this PC option depending on your needs.
- The new user can use their Microsoft id to create a new account.
- If they don’t have any Microsoft ID, Click on I don’t have this person’s sign-in information.
- Click on Add a user without Microsoft Account.
The new users will be available under the other user’s tab, and you can change their account type or remove them from there. To further manage users, you can use the Control Panel.
- Press Windows Key + R > type control and press enter.
- Control Panel > User Accounts.
From here, you can make changes to all your existing users.
Changing Account Name
To modify the current account name of any user, click on Change your account name > Enter new name > press Change Name to apply the change.
Changing Account Type
To modify the current account type of any user, click on Change your account type and select either Administrator or Standard account type.
How Do I Change My Account to the Administrator in Windows?
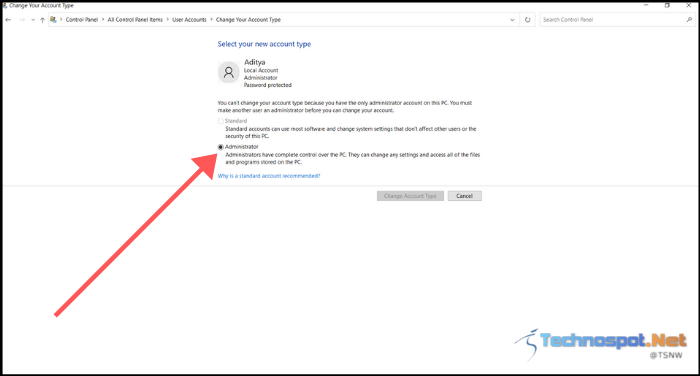
- Open Control Panel > User Accounts.
- Select the user you want to modify, click on Change account type and set it to Administrator.
You can use the same method also to make any administrator account into a standard one.
How Do I Restrict a Non-administrator User Account from Installing Programs in Windows 11/10 Home?
To achieve this, you need to change that account type to standard, and then they will not be able to install software to your system as only administrator accounts have that access.
How Do I Enable or Create a Guest Account on Windows?
- Right-click on the Windows button and open Command Prompt (Admin)
- Type the following command and then click Enter:
net user Visitor /add /active:yes
- It will ask if you want to assign any password to this guest account; you can enter the password or press enter without having any password.
- Now, we will remove this account from the local group, type the command below and press enter:
net localgroup users Visitor /delete
- Lastly, we will assign this user to the guest group to make it a guest account with restricted access to the system; type the command below and press enter:
net localgroup guests Visitor /add
This is how you enable Local Users and Groups in Windows 11/10 Home and add and modify new users and groups.


