How to Delete a Facebook Group | Facebook tips and tricks
Facebook groups allow many users to interact together at the same time. The message of one person may reach thousands of other people. Many organizations, businesses, families, as well as individuals use it for many purposes. Sometimes, we may want to delete a Facebook group after serving its purpose, or for any other reason. This article will show you different ways of deleting a Facebook group, and what we call now Meta group as well.

Mục Lục
How to Delete Facebook Group from Web Browser?
Owners of Facebook groups can delete their groups by first removing all members. When the owner is the only person in a group, they will be able to delete it.
Group admins can archive a group, which means it will no longer appear in non-members’ Facebook searches and no new members will be able to join. Admins can delete a group only after the original owner has left the group. Namely, you can delete a group you created on Facebook.
Here’s how to delete a Facebook group:
Step 1.Open the web browser of your choice and go to www.facebook.com and navigate to “Groups” on the home page.
Step 2.Select the group that you wish to delete from the list of groups that will be displayed.
Step 3.Check the left side of the page. You will see “members“, click it.
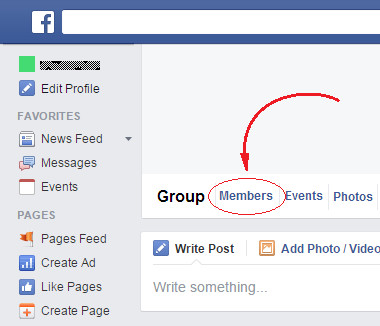
Step 4.On each member’s name, click the “More” icon and then “remove from group” to remove each and every member from the group.
Step 5.Once you are done removing every member from the group, select the “more” icon next to your own name, and select “Leave Group“, then “Leave and Delete“. And that is it.

You May Want to Know:
How to Delete Facebook Account
How to Remove Facebook Group from Mobile App?
If you want to remove a Facebook group via your phone, the steps are pretty much different from how it is done on a web browser.
Step 1.First thing you want to do is to grab your smartphone (iPhone, Android or tablet), making sure it is connected to the internet, launch the Facebook app.
Step 2.Navigate to the “Menu” tab and then select “Groups“.
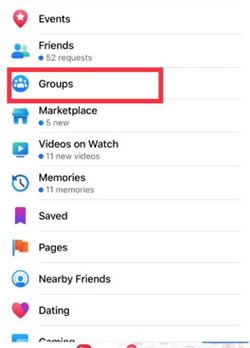
Step 3.Then select “See All” next to “Your Groups“.
Step 4.Once again, select “See All” underneath “Groups you Manage” to view all of the groups you are an admin for.
Step 5.Click and open the group you wish to delete.
Step 6.Click on the name of the group, and then click “See All” to view all of the members on the group.
Step 7.You will have to select each group member’s name and select “Remove Member” to remove them from the group. You will repeat this process to remove each and every member. Sadly, there’s no option to remove all members at once.
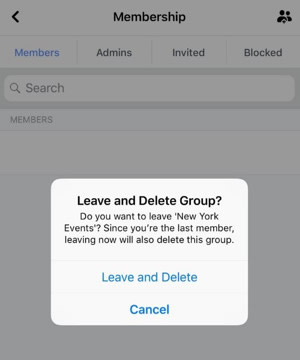
Step 8.Once you have successfully removed every member from the group, now tap on your own name and select “Leave Group“. You will be prompted that leaving the group means that you are leaving and deleting at the same time. Go ahead and select “Leave and Delete“.
Permanently Clear Facebook Cache and Fragments from iPhone
Below we provide two ways to clear up data, cache and fragments from Facebook, one with an efficient 3rd-paprty app, while the other can achieve by Facebook itself.
Method 1
Make a Deep Clean of Facebook Data and Cache
There is a very simple way to clear Facebook Cache and Fragments from your iPhone without stress using the iMyFone Umate Pro app.
iMyFone Umate Pro app is a highly rated app from hundreds of satisfied customers all over the world, and it is also highly talked about on Macworld. It is highly recommended you use this app to permanently delete Facebook cache and fragments from your iOS device because it is an automatic process.
![]()
1,000,000+ Downloads
Key Features:
Selectively erases messages, contacts, call history, photos and videos, browsing data, etc., from your iPhone or iPad with 0% recovery. It effectively cleans up unnecessary files, frees up more space and speeds up your iPhone or iPad. This wonderful app works for many other social apps including, WhatsApp, Viber, Kik, LINE, WeChat and lots more.


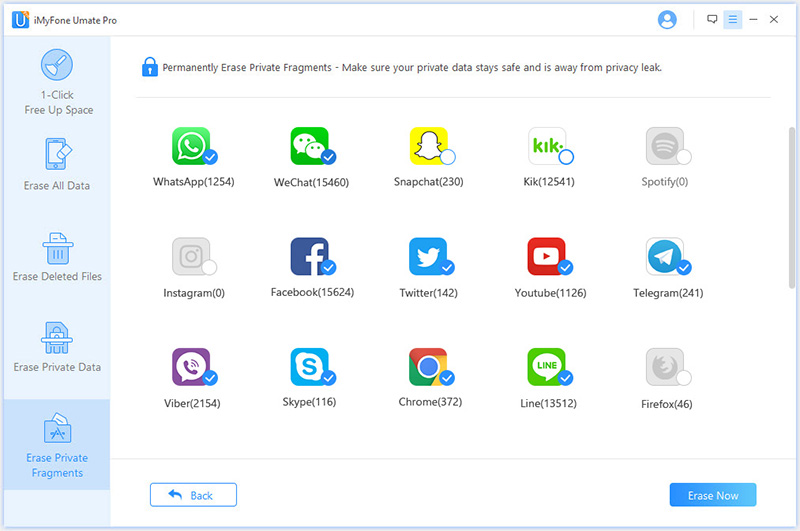
Step 1.Download and install the iMyFone Umate Pro on computer. Launch it and select the ‘Erase Private Fragments‘ function.
Step 2.Connect your iOS device to the computer via USB cables and select ‘Trust this computer‘ on screen. Tick ‘Facebook‘ and click on ‘Erase Now‘ to delete cache and fragments from Facebook.
You May Want to Know:
Detailed Steps to Clear Facebook Cache on iPhone
Method 2
Deleting Facebook Data & Cache via the Facebook App
Deleting Facebook cache via the Facebook app:
Step 1.Launch the Facebook app on your iPhone.
Step 2.Tap on the “More” icon at the bottom of the screen.
Step 3.Select “Settings” and then “Account Settings” from the drop-down list.
Step 4.Click “Browser” to open the Browser Settings page.
Step 5.Now, click “Clear Data” and you are done.
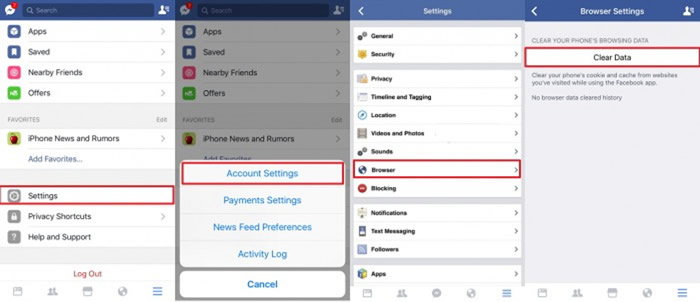
However, keep in mind that it only deletes the cookies and cache from websites you’ve visited while using the Facebook app on your iPhone.
Clearing Facebook cache from the Settings app:
Another way to clear Facebook cache from your iPhone is by uninstalling the app and then reinstalling it.
Follow the steps below to uninstall Facebook from your iPhone:
Step 1.Open “Settings“.
Step 2.Go to “General“, then “Usage“.
Step 3.Then locate “Manage Storage” from the next screen.
Step 4.Select Facebook, then “Delete App“. That is it!
Bonus Tips: More Deletion Tips of Facebook
How to Delete Facebook Page
If you wish to delete a business page, company page or community page, follow these steps to get it done in no time.
Step 1.Login to your account via www.facebook.com on your smartphone, iPad or computer.
Step 2.Navigate to the page area from your homepage, which is also your News Feed, by clicking on “Pages” in the left menu. This will provide a list of all the pages that you administer. Click the name of the page you want to get rid of.
Step 3.In the left menu, select “Settings“. This will bring up a large number of subsections under Settings.
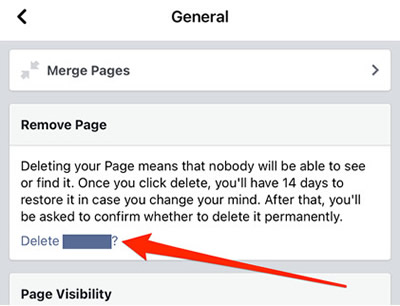
Step 4.Select “General” and scroll down to “Remove page“.
Step 5.In the far right, choose “Edit” and then “Permanently delete“. This will open a little pop-up box in which you will be prompted to confirm if you wish to delete the page.
Step 6.Click “Delete” and you’re done.
You May Want to Know:
How to View and Read WhatsApp Backup on Google Drive
How to Delete a Post from Facebook
Step 1.Launch the Facebook app.
Step 2.Tap the three horizontal lines on the bottom right to access your timeline, then tap your name at the top.
Step 3.Tap the three dots in the top right corner of the post to erase it.
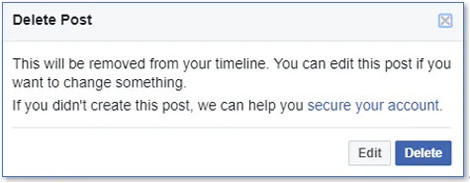
Step 4.Select “Delete“. Facebook will next prompt you to confirm that you actually want to delete the post.
Step 5.Hit “Delete Post” to confirm.
You May Want to Know:
How to Deactivate Facebook Messenger on iPhone
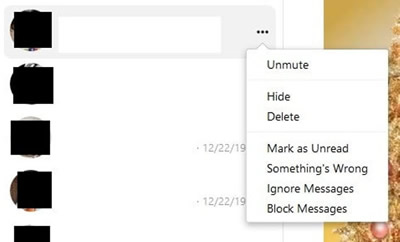
How to Delete Facebook Message
Step 1.Log into Facebook.
Step 2.Click the Chat Bubble in the upper-right corner, followed by See All in Messenger.
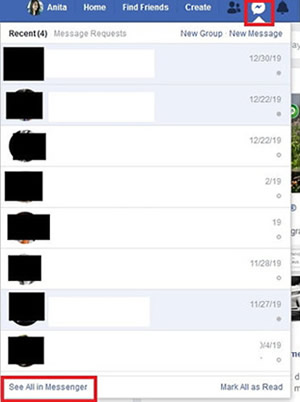
Step 3.Hover over the message and click the 3 horizontal dots symbol on the right side of the message in your inbox to remove the whole message thread. Then, from the list that appears, choose Delete, then Delete again.
Step 4.To eliminate a portion of a chat, enter the conversation and mouse over the message you want to delete. Then, choose the 3 horizontal dots and press the “Remove” button.
You May Want to Know:
How to Delete Facebook but Keep Messenger
Conclusion
Above are specific steps in deleting a group from Facebook on your web browser or the mobile app. Other useful deletion tips for Facebook are provided as well. To make a deep clean of your iPhone and erase all the data, cache from Facebook, iMyFone Umate Pro can do you a favor.
Try It Free
Try It Free


