How to Reset an ASUS Laptop?
From fixing a major issue on your system to improving your system’s performance, resetting your laptop is going to be the best choice. Resetting deletes all your installed applications and personal files in the drive containing the OS. Furthermore, if you are looking to sell your ASUS laptop, you would also want to consider resetting it.
You can use ASUS Recovery mode on an ASUS laptop to restore your system to factory defaults. However, besides this, there are several other methods to reset ASUS laptops.
How to Reset ASUS Laptop?
Depending on the type of system reset you want to perform, there are three methods you can follow. Let us first start with the method that is only specific to ASUS laptops.
Reset Using ASUS Recovery
ASUS recovery tool lets you reset your ASUS laptop to its original state, deleting all applications, files, OS settings, and installed software. Besides this, if you have upgraded the Windows version, the recovery tool will also restore the previous version of Windows. However, not all ASUS laptops support ASUS recovery.
ASUS recovery feature is only available to all models released after January 2020 that have Windows 10 Pre-installed. If you cannot find settings named MyASUS in WinRE in the advanced troubleshooter menu, there is a chance your ASUS laptop does not support ASUS Recovery.
Note: Performing a factory reset will remove all your data and installed applications. So make sure that you back up all your files.
Mục Lục
Boot into Advanced Startup Menu
To boot into the advanced startup menu,
- Press the Windows + I key to open Settings.
- Go to System > Recovery.
- On Recovery options, click on Restart now. The PC will now boot into the advanced startup menu.

Alternatively, you can hold shift and click on Restart to directly boot into the Advanced Startup menu. Or you can also press F9 or F12 key repeatedly during startup to boot into MyASUS in WinRE
Run ASUS Advanced Recovery
Once you are in the Advanced startup menu,
- Select Troubleshoot.

- Now, click on MyASUS in WinRe. You cannot perform ASUS Recovery if you cannot see MyASUS in WinRe option.

- Select ASUS Recovery.

- A window will pop up confirming the reset. Select Yes.
- Now, follow the reset process to reset your ASUS laptop.
Reset From Windows Settings
One disadvantage of performing a factory reset is that the system will revert the current OS version. So, if you have upgraded the OS to Windows 11 from Windows 10, the factory reset will revert to Windows 10. Now, this is where resetting OS from Windows Setting comes in.
Unlike the ASUS Recovery tool, this method will not revert the current version of the OS. Furthermore, it gives you a choice to keep or delete personal files. However, all installed applications will be removed.
- Press the Windows + I key to open Settings.
- Go to System > Recovery.
- Under Recovery options, select Reset PC.

- Here, you can either choose to keep your files or remove everything.
If you choose Keep my files, the system only deletes files on the drive containing the OS. If you choose Remove everything, all your files and folder will be deleted.
- Choose an option.
- Then select Local Reinstall if you want to reinstall Windows from the device, and select Cloud download if you want to download an image and reinstall.

- Select Next.
- Now, select Reset.

The reset process will now begin. Follow the steps
Reinstall OS Using Bootable USB
You can also reset the ASUS laptop by performing a fresh OS install. To do this, you will need a bootable USB device. A bootable USB device contains OS installation files. Using this, you can reinstall and replace the existing OS.
Doing this will remove all your personal files in the drive containing the OS and your applications. Therefore, make sure that you back up any necessary data.
Make Bootable USB
Before we begin, you must make your USB drive bootable with the OS file. To do this, you will need the Operating System iso file you can get from the internet. Now, follow the steps below to make the USB bootable.
- Download Rufus and run the executable file.
- Connect the USB device to the laptop.
- Under Device, select the USB drive.
- Select the iso image in Boot Selection.
- Select either MBR or GPT, depending on your storage device partition style.

- Now, click on Start.
Set Boot Priority
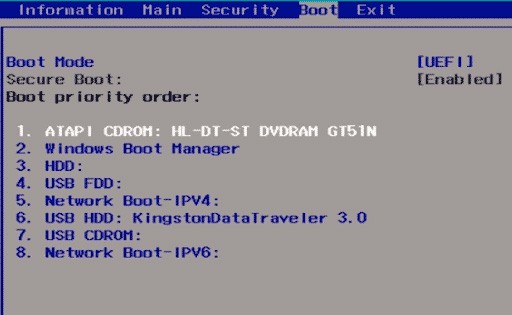
Now that you have a bootable USB drive, you will need to reconfigure settings so that the OS reads the USB drive first. You can set the Boot priority from the BIOS.
- Enter the BIOS by pressing the BIOS key repeatedly during startup. The BIOS key can be any one of the Function keys or the Delete key.
- Search for settings like Boot order or Boot Priority. These settings could be inside the Configuration or Boot option depending on the model of your ASUS laptop.

- Make sure you set the USB drive to the top of the list.
- Save and Exit the BIOS and restart your PC.
Install OS
Once the PC restarts, the system will boot from the USB drive, starting the new OS installation process. During the process, make sure you select C drive as the drive to store the OS.
Once the OS installation process completes, your entire OS configuration and application will have been reset.


