Reset the BIOS of an Asus motherboard (by using the CLR_CMOS button) – BIOS – Tutorials
Reset the BIOS of an Asus motherboard (by using the CLR_CMOS button)
If you have changed settings in the BIOS of your Asus motherboard and you no longer know what you changed, there are several ways you can reset the values to the defaults.
To do this, refer to our previous tutorial : Reset your BIOS settings.
However, it can also happen in rare cases that your computer doesn’t start anymore and/or that you can no longer enter the BIOS.
This is what happened to us by accident during the realization of a tutorial for our professional site : InformatiWeb Pro.
The 1st solution that works with all motherboards is to :
- physically unplug the computer
- remove the flat battery (CR2032 model) on the motherboard
- wait 30 seconds
- put the battery back
- reconnect the computer
However, in our case, the battery was not easily accessible because of the hardware present in this computer.
Fortunately, our Asus WS X299 SAGE/10G motherboard has a red “CLR_CMOS” button (located at the bottom of the motherboard) to erase the settings configured in the BIOS to reuse the default values during the next boot.
To use this button, turn off the computer and unplug it from the electrical outlet.
Then, press this red button “CLR_CMOS” for 2-3 seconds.
Finally, reconnect the computer and start it up.
Note : it may seem weird to press a button while the computer is unplugged, but this is the procedure described by Asus and it works.
This button probably cuts off power to the CMOS chip from the CR2032 battery on your motherboard when you hold it down for a few seconds.
This has the effect of emptying the CMOS chip and therefore deleting the settings that you had configured in the BIOS of your motherboard.
![]()
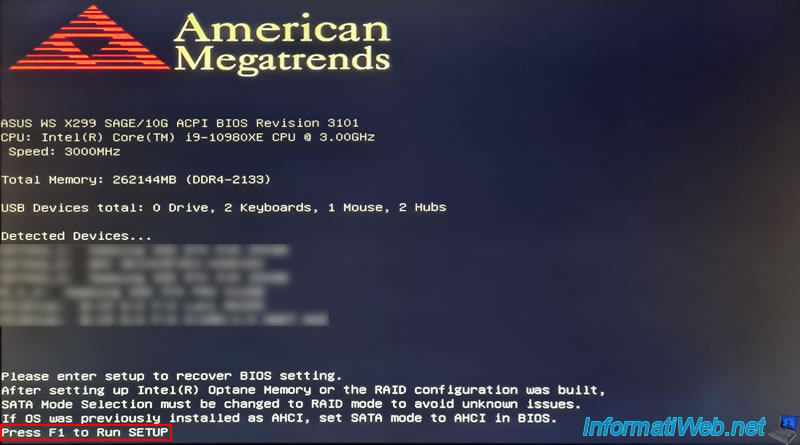
At startup, the logo of American Megatrends (which is the manufacturer of the BIOS customized by Asus) will be displayed, as well as information about your motherboard, your processor (CPU), …
Press the F1 key as requested by Asus.
Note that Asus also warns you that if you changed the controller mode to AHCI or RAID, you will need to restore this value for your operating system (eg Windows) to boot properly and for your RAID volume (array RAID) if any can be detected by it.
Plain Text
Please enter setup to recover BIOS setting.
After setting up Intel(R) Optane Memory or the RAID configuration was built,
SATA Mode Selection must be changed to RAID mode to avoid unknown issues.
If OS was previously installed as AHCI, set SATA mode to AHCI in BIOS.
Press F1 to Run SETUP.
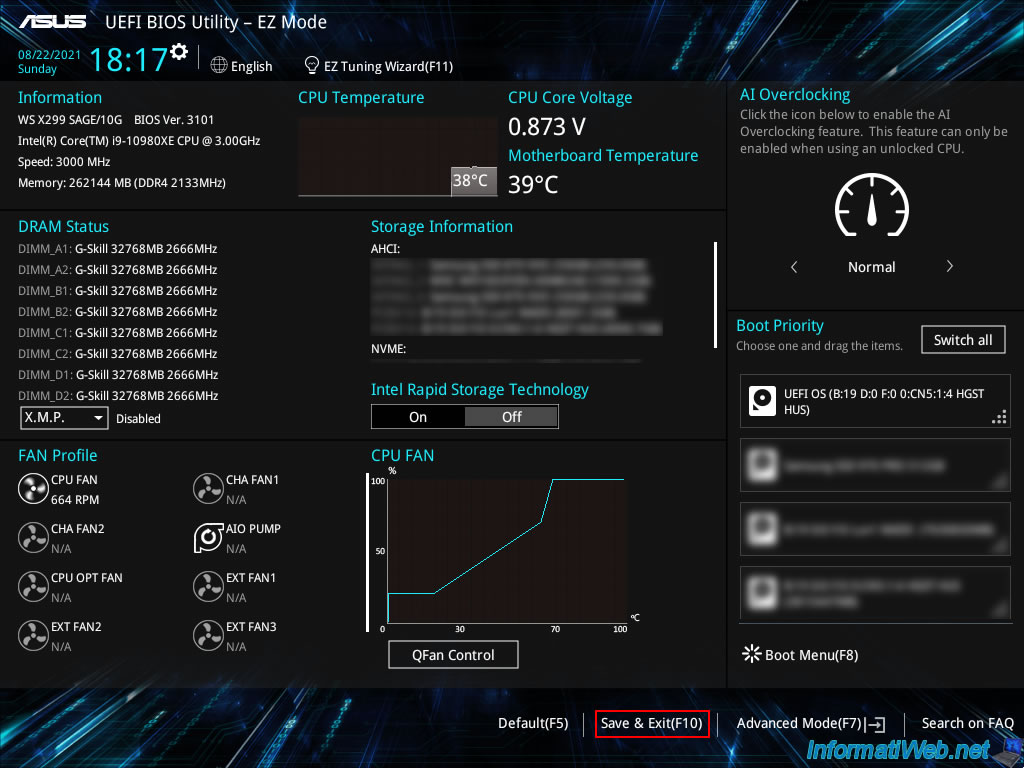
Once you have entered the BIOS of your Asus motherboard, change the boot order of it to boot to the hard drive or SSD where Windows is installed.
Re-enable the desired features (if necessary), such as processor virtualization (Intel VT-x / AMD-V), … if desired.
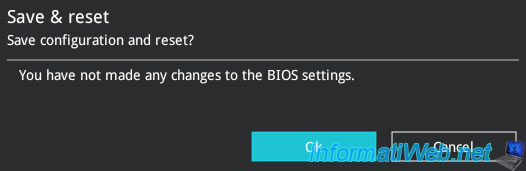
Then, click on : Save & Exit (F10).
Note that even if you don’t want to change anything, you will need to click “Save & Exit (F10)” this time for the default settings to be copied to your motherboard’s CMOS chip.
Confirm saving the settings by clicking on OK.