
Correct setting bios asus. Three ways to reset the BIOS on a laptop
Often, when working with a PC or laptop for one reason or another, it is necessary to enter the BIOS. For example, if you want to run bootable USB flash drive and reinstall the system from it, or adjust the memory or processor, set a password, and so on. This article focuses on how to enter the BIOS, because not every laptop owner is familiar with this process.
What it is?
The BIOS is a basic system, the basis of any laptop and computer, which is a firmware that is implemented in every motherboard. It is simply necessary for correct work the whole system. It contains all the most important settings, from it you can access any device “on board”, change its characteristics and working (regular) mode. The BIOS is divided into several logical sections. Each company-manufacturer of this quantity varies slightly. For example, one section includes the configuration of the processor and memory, the other – hard driveand the third provides information on the temperature conditions of the unit and its parts, and so on. With the help of BIOS, you can fine-tune your PC or laptop for your individual use, set a password, speed up system startup and overclock some components.
How to get there?
An interesting point is that the entrance to the BIOS depends on what company laptop. As mentioned above, each manufacturer sets a certain key combination to enter this firmware. In this connection, the urgency of the question of how to enter the BIOS arises. On laptops, the number of such combinations is much greater than on the PC. You need to start with the fact that any combination (regardless of the laptop company) should be pressed when the first image appears on the screen, that is, when the laptop starts to load. It should be pressed quickly, but for a more confident entrance, do it several times, because there is not much time left for entering the BIOS.
 It is about 3 seconds. To go to the BIOS on a laptop, you need to press the “Delete” key or one of the keys with the letter “F”. Typically, the input uses “F1” or “F2”, less often – “F12”. Sometimes you need to press “Delete” and one of the “F” keys at the same time. Pay attention to the primary boot screen, in its lower part it is usually written what combination of buttons should be pressed to enter this firmware. As a rule, when buying a laptop, the client is given an instruction in which it is clearly written and shown how to enter the BIOS. On HP laptops, the input is generally original: you first need to press the “Esc” button, after which you will be given the choice to launch the settings menu or boot from the disk. On some models of the same company, the input is made by pressing the “F10” key. On Dell laptops, launching BIOS is possible by pressing the “F2” button. It is worth noting that the equipment of this manufacturer is quite easy and convenient launching the settings menu. Most fAQ how to enter the BIOS in a laptop is set by owners of Acer equipment. Here the program opens in several ways: “F2”, “F1” or “Alt” + “Ctrl” + “Esc”.

What you need to learn
So, we hope you understand how to log in to BIOS, and what it is. It is important to remember a few points. First, always read the instructions for the device. Secondly, pay attention to the loading screen, as well as what is written on it. Thirdly, the key combinations are most often represented by the “Delete” button and some other “F” key.
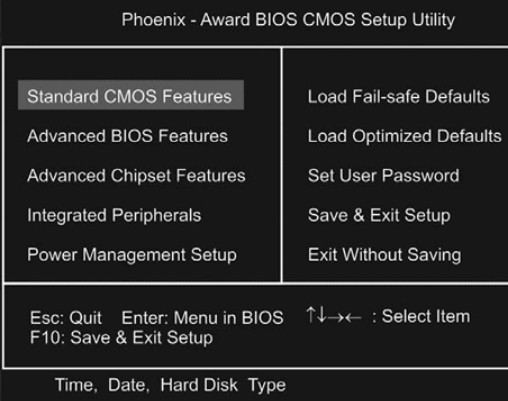
BIOS is a very necessary and important program. It is present on all computers. This abbreviation stands for English as the Basic Input Output System. This program serves for the pre-launch check of the entire health of the laptop, configures them and loads the operating system. How to configure the BIOS on a laptop? Bios on a laptop is just as important as a normal, stable operating system. Without it, your laptop just will not start. There are cases that due to improper BIOS settings, the laptop was in repair. It is necessary to remember that Laptop BIOS and personal computer BIOS are significantly different! Since on the laptop its version is unique. Therefore, before its firmware should be especially careful. The need to configure the BIOS on a laptop arises mainly in several cases: Changing the priority of boot devices (for example, to install the operating system, you must boot from a CD-ROM or Flash-card). The need to change the settings of the hard disk controller (relevant when installing Windows7). Disable unused or faulty devices. Removing or setting a password. To enter the BIOS of the laptop – you need to press a certain key combination when loading, usually they are displayed at the bottom of the screen as a hint. For example, Press DEL to enter setup – this means that to boot the BIOS this laptop you must press the DELETE button. If the prompt is missing, then you should refer to the instructions (which comes in the kit). After you enter the settings menu, a menu will appear in front of you. Depending on the model – it will be different. For example, in the BIOS menu from Award and Phoenix, the settings are listed in two columns, and the bottom shows the key assignment.
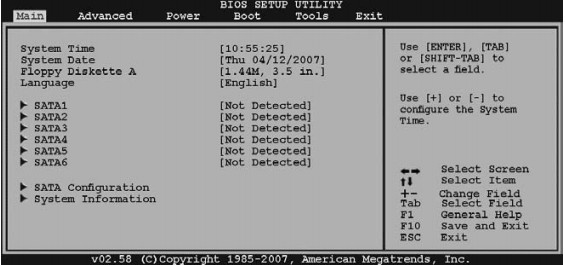
The AMI BIOS settings menu is pretty standard and is found on both laptops and personal computers.
Mục Lục
Setting boot priority in laptop BIOS
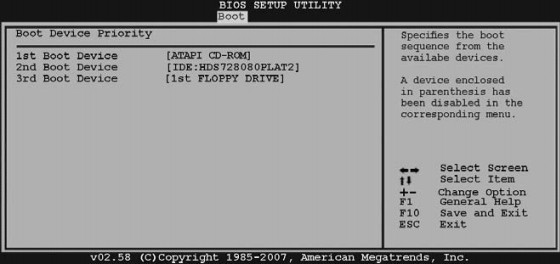
In most cases, the system boot parameters are set in the Advanced Features menu or simply Advanced (in the advanced BIOS versions in the BOOT menu). In the menu that opens, sometimes there are several download points (1st Boot Device, 2nd Boot Device and …). If you want to boot from the hard disk (HDD) – you need to specify it first in this list. When booting with these parameters, the BIOS will not poll disk drives, and immediately go to boot from the HDD. If you want to boot from a DVD \\ CD drive, then set it first in this list.
Setting a password in the laptop BIOS
In all modern versions of Bios provides a function to set a password. Called either Password protection or Sucurity. In this section, the menu is usually 3-4 settings. Setup password or Admin Password – this function sets the password for entering the BIOS menu. Internal HDD Password – sets a password for loading it from a hard disk, while the disk is encrypted at the hardware level and cannot be read without the entered password. System Password – the function sets the password that must be entered every time the computer boots.
On a laptop, it can sometimes serve as a radical method against malfunctions on a laptop computer.
Sometimes in case of system failures, only full resetting of settings helps; the user should know the main nuances of these techniques.
In most cases, if the problem is not in the hardware, it helps to return the device to a healthy state.
Reset features
At first glance, resetting BIOS settings to factory values is nothing complicated. However, for the user conducting it for the first time (and most laptop owners may never encounter such a need), some questions arise in the process. Especially if the software methods did not help, and for the reset you will have to disassemble the laptop.
There are several reasons for accessing one of the BIOS reset methods:
- reset forgotten, unknown (set by another user) or lost password to BIOS. Although, if the user is not going to change anything in the settings, he may not need such a reset;
- incorrectly executed overclocking of the processor, during which critical values of memory timings or bus frequency were set. However, usually on laptops it is not recommended to overclock the chipset – not only because of malfunctions, but also because of problems with cooling;
- the system does not boot for an unknown reason, although you can still log in to the BIOS;
- bIOS changes have been made by a non-expert who does not remember which parameter should be returned to its original state.
BIOS reset options
For a laptop computer, as well as for a stationary computer, there are several options for solving a BIOS problem by resetting it:
- reset the settings using the interface itself (a method that is suitable only if it turned out to be entered in the BIOS);
- using a special utility (used for 32-bit operating systems);
- hardware (mechanical) method.
Additional ways to reset can be found in the documentation on the computer, if it is preserved. Will help to resolve the issue and instructions for a specific device model; most often they can be found on the web – on the manufacturer’s website or, in extreme cases, on the forums of owners of similar models.
Reset via BIOS
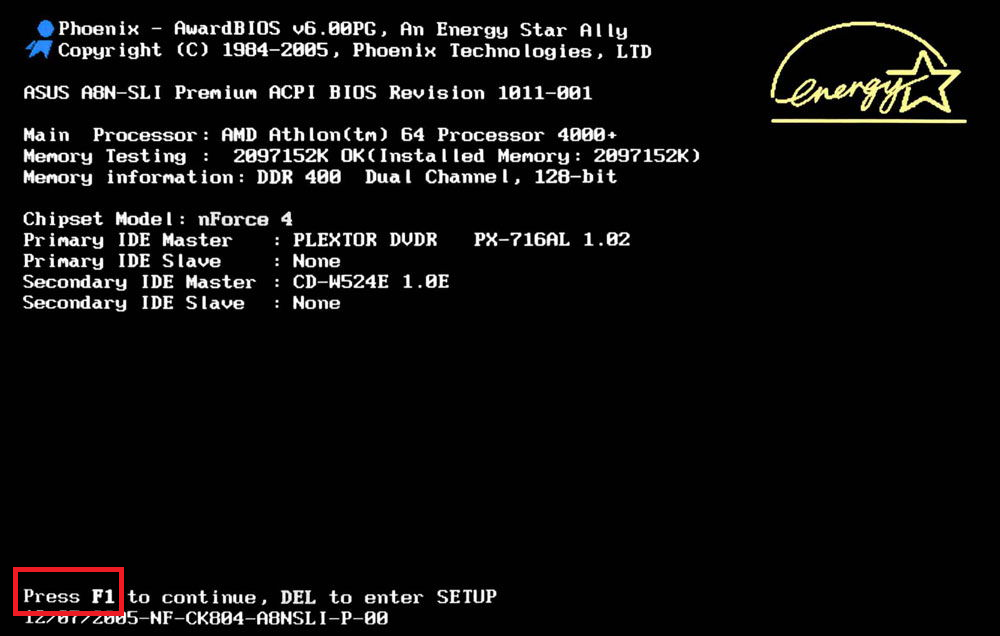
To simplify the task of the user, resetting the settings to default values is possible using the utility built into the BIOS. In order to use it, you should enter the interface by pressing a certain function key during the download. Most often it is Del and F2, less often – Esc, F10 and F11. You can determine more precisely which key you need to enter the settings, you can immediately at system startup, when this information appears at the bottom of the screen.
Tip: For the UEFI interface, the download is too fast, and the flashing sign is not easy to see. In this case, you can try to click on all the functions in turn or find the one you need on the Internet using your laptop model.
After entering the BIOS menu, you should find the Exit menu and select Load setup defaults in it. By agreeing to resetting the settings (selecting the Yes button), you will restore their factory values. After pressing F10, your changes will be saved.
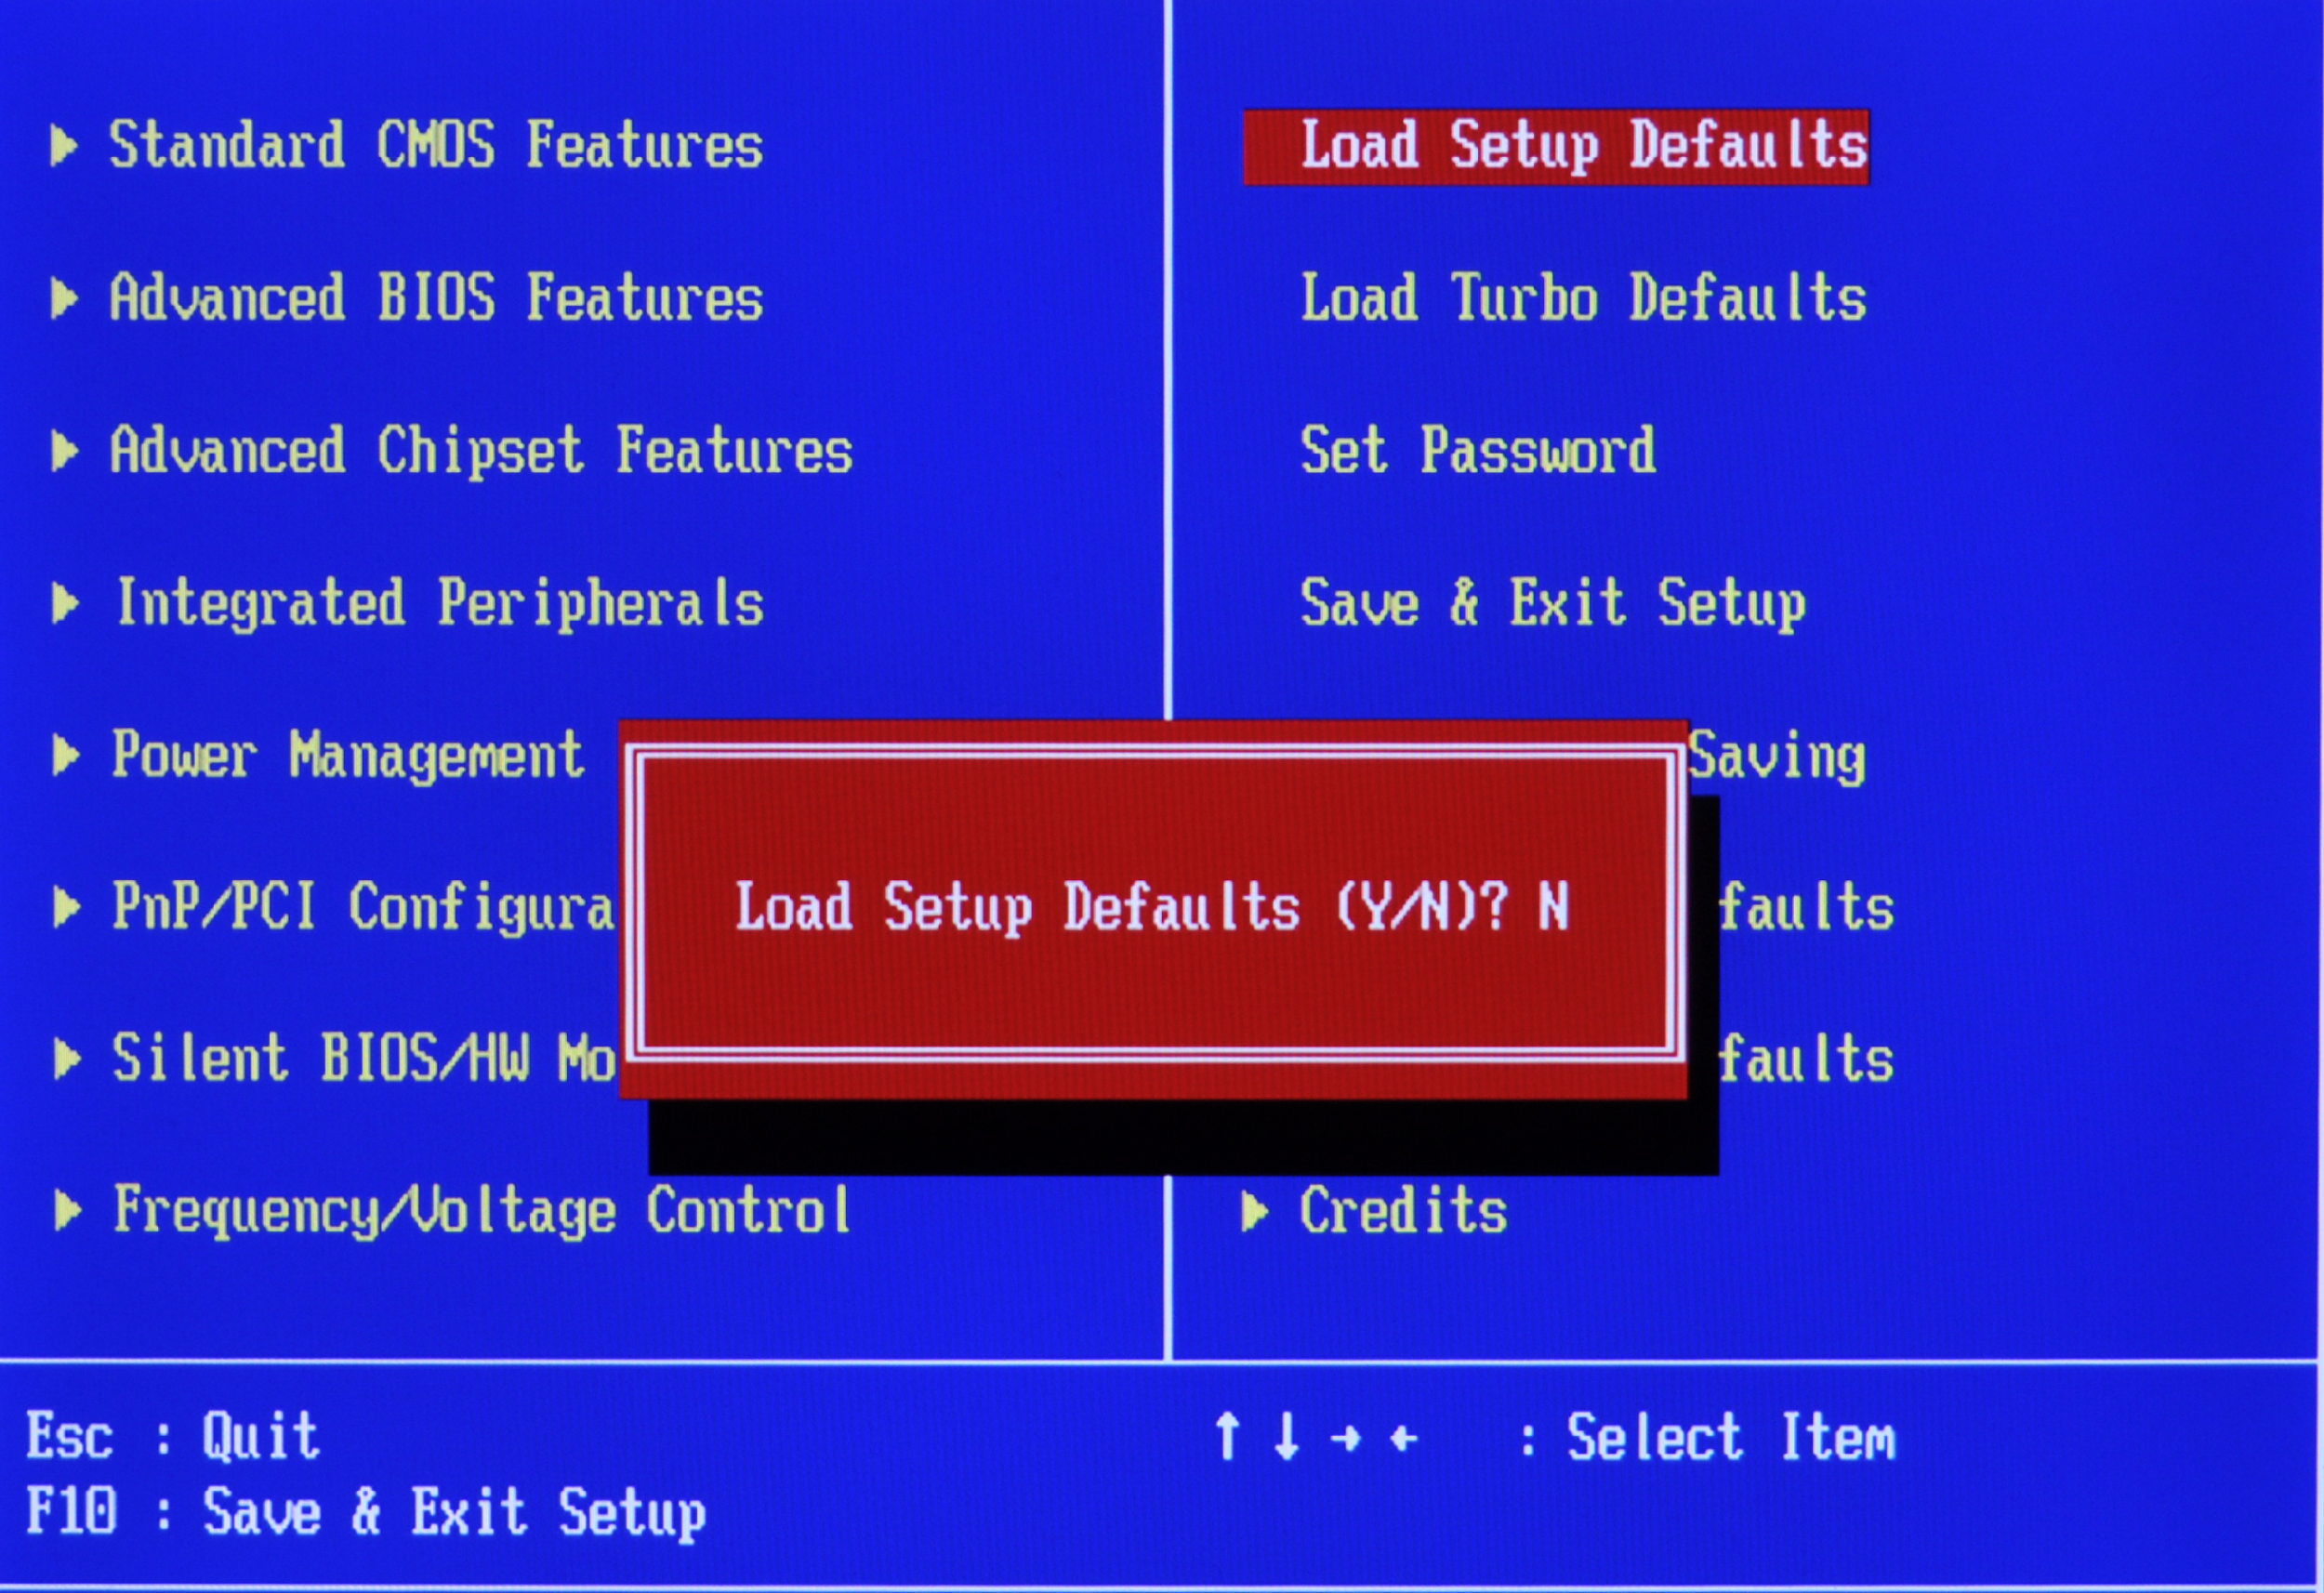
Owners of some models of laptops can see in the BIOS menu and other labels, except for Load setup defaults. For example, a Sony user will find here the inscription F3 Optimized Defaults, indicating that after pressing this function key and saving changes, a reset will also occur.
For modern models of brands Samsung, Toshiba and HP in the settings there is the item F9 Setup Defaults, usually located in the bottom or right side of the screen. This means that to reset, you need to press F9 and save the changes.
For outdated hardware models whose BIOS is different from modern options, in the settings you need to find the items Use Default Settings or Set BIOS Default.
When they are selected, an inscription suggesting either resetting to factory settings (Load Optimized Defaults) or switching to settings optimized for protection against failures (Load Fail-Safe Defaults) may appear on the screen.

In most cases, resetting the settings will result in the restoration of the computer’s performance and normal boot.
However, if an error occurred during the zeroing process, for example, when selecting the media from which the system boots, the user will have to enter the BIOS settings once again and make small changes:
- Open BIOS;
- Go to the Boot;
- Select the Boot Mode tab and, if this field contains UEFI, change it to Legacy;
- Save changes and reboot the system.

A program reset method may not work. For example, if the BIOS is password. Or enter it fails for some other reason.
DEBUG utility
Changing the interface settings is also possible with the help of a special utility for Windows. It is built into the 32-bit versions of the OS and requires a run as administrator to work. It is easy to reset with its help, although it is required to have administrator rights:
- Open the command execution menu (Win + R);
- Enter the debug.exe command;
- After it opens command line, enter one by one from the keyboard: “o702E”, “o71FF” and “q”;
- After entering each command, press the enter button.
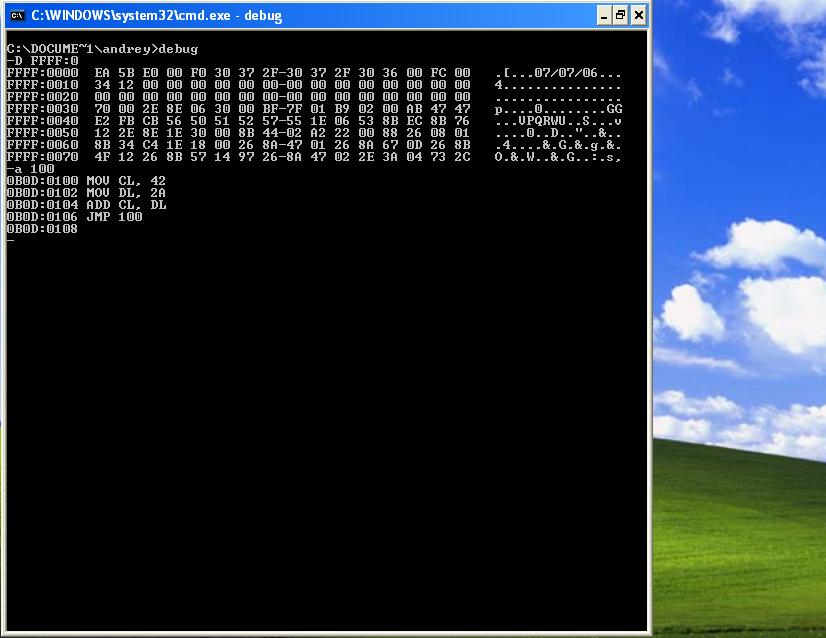
After this, the BIOS settings are reset. And, rebooting the system, the user will see an error message and the need to check the settings. Next, you need to manually configure the BIOS or leave the settings as they were when you purchased the device.
The only drawback of the utility is the inability to work in 64-bit windows versions. And, therefore, it is not suitable for most modern operating systems that require the use of other techniques.
Hardware method
A hardware method of resetting the laptop BIOS settings is required in cases where the password is unknown, forgotten, or when the user has not installed any protection, but the BIOS is still protected.
In this case, the selection of the password and the use of special tools on boot disk do not help. The only way out is hardware zeroing.
BIOS reset button
Notebook models released in the last 2–3 years make it possible to do without disassembling the device. To reset the BIOS, simply follow these steps:
- Turn off and turn the laptop lid up;
- Check the bottom of the CMOS inscription on the case, near which there may be a special hole to reset the BIOS;
- Insert a sharp object like a clip or stud into the hole and hold it for half a minute;
- Turn on the laptop.
If no holes are found behind the notebook, it should be disassembled.
Attention! Further instructions – only for advanced PC users!
Remember that removing the cover and disassembling the computer leads to a loss of warranty.
Before disassembly, be sure to remove peripherals (disconnect the power cord if the computer is charging, remove the flash drives and cables connecting to other equipment) and battery.
Battery disconnection
One of the simplest hardware reset methods is to turn off autonomous power to motherboard. Most notebook models store BIOS settings and the current time in memory, which depends on a small CR2032 battery.
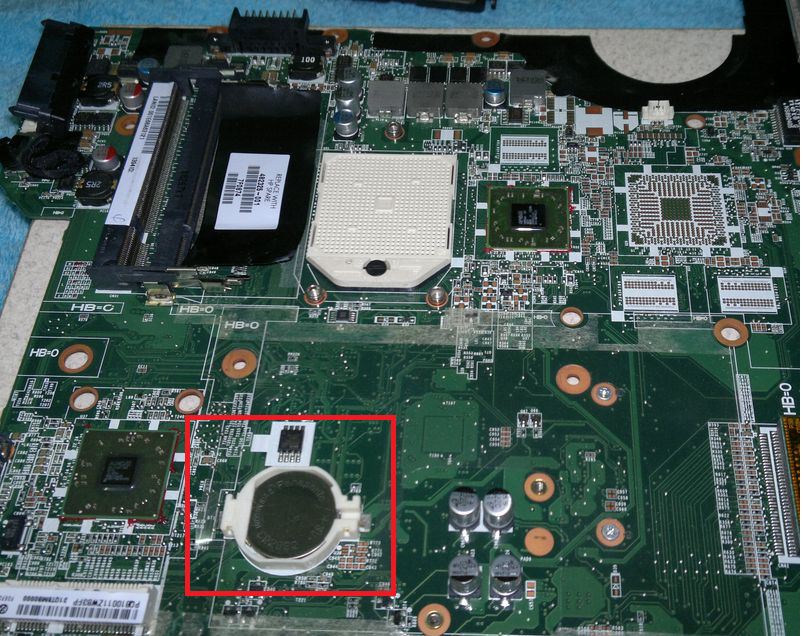
Removing this battery, you can turn off the power to the BIOS and reset all settings, including the password. De-energize the board will have for a period of 5 to 40 minutes, depending on the model. Sometimes the device may be non-volatile and no reset will occur.
The battery is easy to reach – usually it is located close to one of the edges of the board and is not covered by other components.
From the user will be required:
- remove the cover;
- de-energize the device by removing the battery;
- find a miniature power source;
- lightly push the latch and remove the battery;
- wait for some time (in order not to carry out the procedure again, it is better to wait at least 40 minutes);
- install the battery back by the same easy pressing;
- turn on the laptop;
- configure BIOS again, setting the clock, date and order of the system boot.
Some boards have a built-in non-removable battery. For them, removing the battery is not possible, so you should go to the last of the ways.
Switch Jumper Cleaning
The jumper switching method is based on the laptop having a special jumper, which is responsible for BIOS reset.
To find it, you will need to remove the cover of the laptop computer to open access to the board. Most often, the switch is located near the battery, and the jumper is usually signed with CLRTC, CLR and CCMOS type labels.
The contact area of the jumper almost always consists of three contacts. To reset the BIOS, you must move the jumper one step: from the first position to the second or from the second to the third.

While the jumper is in the switched position, you need to press the laptop’s power button and hold for at least 10 seconds.
Naturally, with the power off, the laptop will not turn on, but the signal will be transmitted to the jumper. After this, the jumper is returned to its original position, the computer is assembled, and the BIOS is reset.
Tip: instead of a jumper on a laptop’s jumper, there can be a special button, clicking on which allows you to perform a similar action. Click should be a pencil or pen, waiting for the same 10 seconds.
Using any hardware technique, from removing the battery to switching the jumper, although almost 100% guarantees a reset, can lead to a loss of warranty for a new laptop, so it’s worth using them only after the end of the warranty period.


