My Perfect Apple Pie
The one trick with this apple pie recipe that makes all the difference? Baking the apple slices first. It’s the magic key to a crispy base, superior flavour and perfectly-cooked-and-never-mushy filling. It’s also how you get a generous amount of pie filling without the dreaded giant empty cavity under the lid.
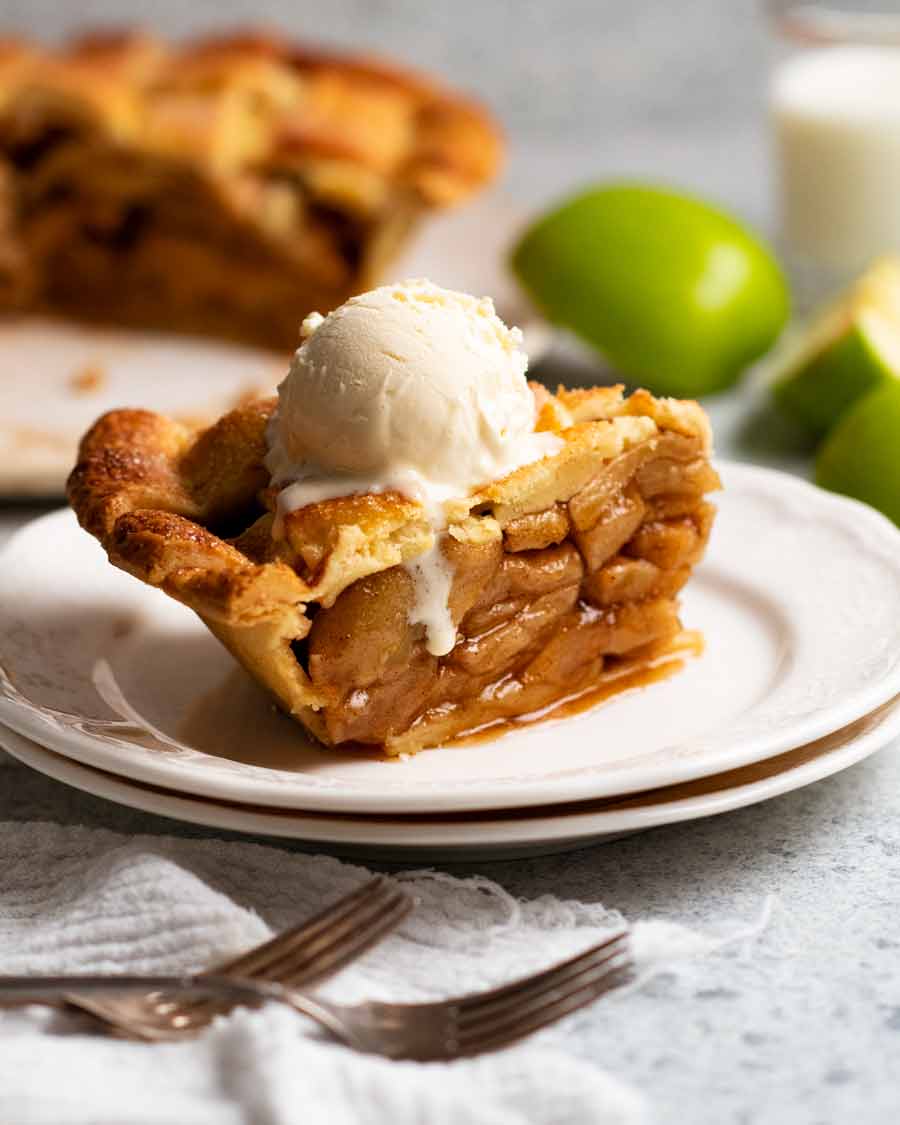
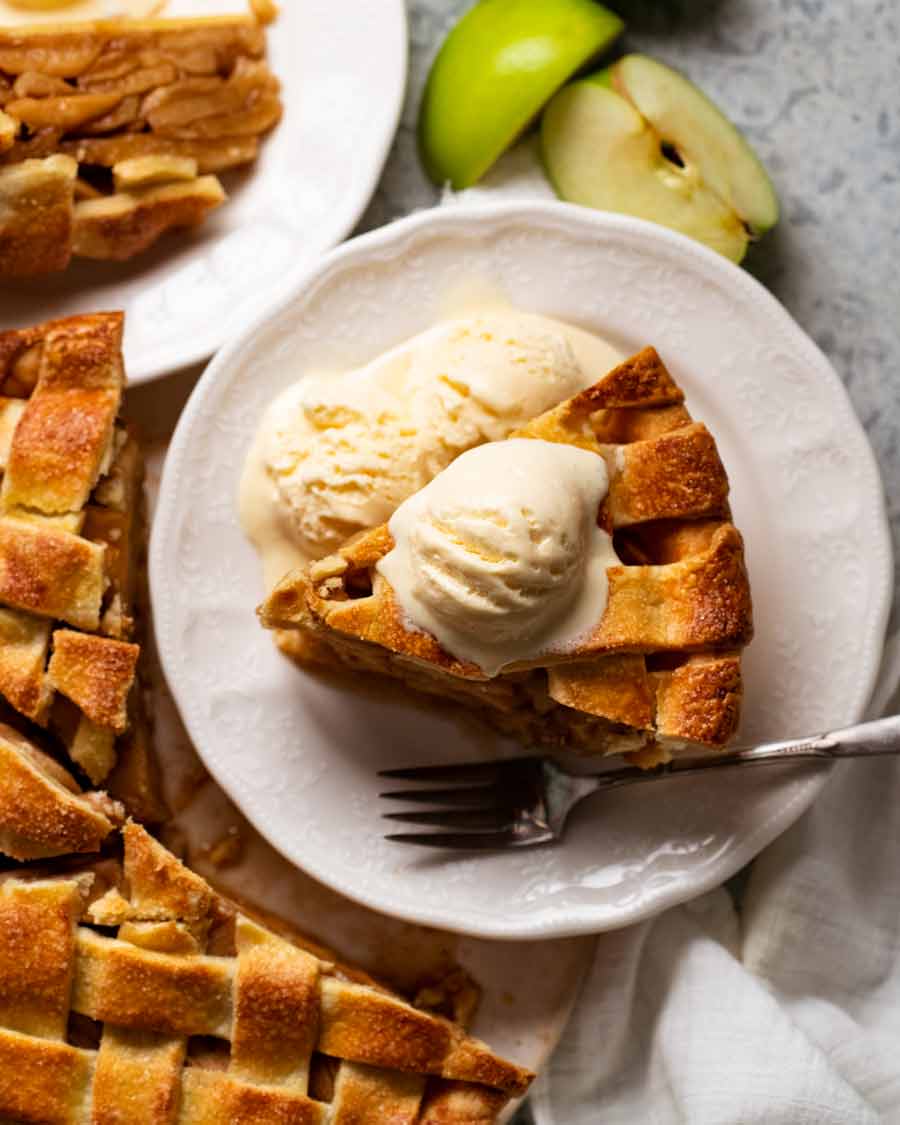
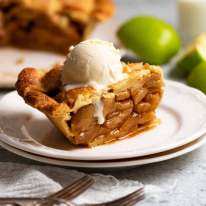
Serve this all-time favourite warm with a scoop of vanilla ice cream for the perfect homemade dessert!
Mục Lục
My perfect Apple Pie
Of all the sweet pies out there, Apple Pie might just be the most iconic of them all. In America, it’s practically its own religion and talk about what exactly makes the perfect Apple Pie can get as prickly as politics.
Well, let me weigh in and tell you about my idea of the perfect Apple Pie.
My perfect pie is packed with a generous amount of apple filling that’s never mushy and never undercooked. There’s some spicing but it’s even-handed and doesn’t overwhelm. The filling is also not overly sweet and won’t leave you grasping for a glass of water.
Then the pastry. All this cosy apple goodness is encased in a shell of irresistibly flaky, buttery shortcrust. It’s not chewy nor is it sad and soggy. And let’s not forget the base! Of course it’s got to be perfectly crispy – no exceptions.
That’s my vision of perfect Apple Pie. If that all sounds good to you, then dare I say this might become your perfect apple pie recipe too. I hope you enjoy this recipe for many years to come!
Recipe credits – Many thanks to my French pastry chef teacher Jennifer Pogmore and RecipeTin’s Chef JB for their assistance and expertise to bring my vision of the perfect Apple Pie to life. We did it!!!
Where so many Apple Pie recipes go wrong
I don’t normally write so bluntly. But this is a very long post so I don’t have time for measured politeness!
My recipe for perfect Apple Pie is really borne of all the things I have disliked about other Apple Pie recipes I have tried over the years, which I wanted to address. Here’s my biggest gripes:
-
Soggy base or crust not properly cooked – This one’s a common problem with recipes where the crust is not blind baked before filling with apples, or raw apples are baked inside the crust. Apple juices have to go somewhere, you know?? That somewhere is into your pastry. (And nope, thickening with cornflour/cornstarch won’t save the pie.)
-
Mushy apples. Or it’s opposite, crunchy undercooked apples – I don’t know which is worse. Both are just a big fat no!
-
Overly sweet fillings and spice overkill – I want to taste the apples!
-
Not much apple flavour – Some recipes even boil apples … ick. Just no.
-
Skimpy amount of filling – Any recipe calling for less than 1.5kg / 3lb of apples will end up pretty scant on the filling. Pies are supposed to be all about generosity!
-
A giant empty cavity under the lid – A recipe calling for raw apples to be piled high in the crust results in a bulging pastry cage for a lid. The lid smashes in when you cut it, creating a frightful (though admittedly still-delicious) mess!
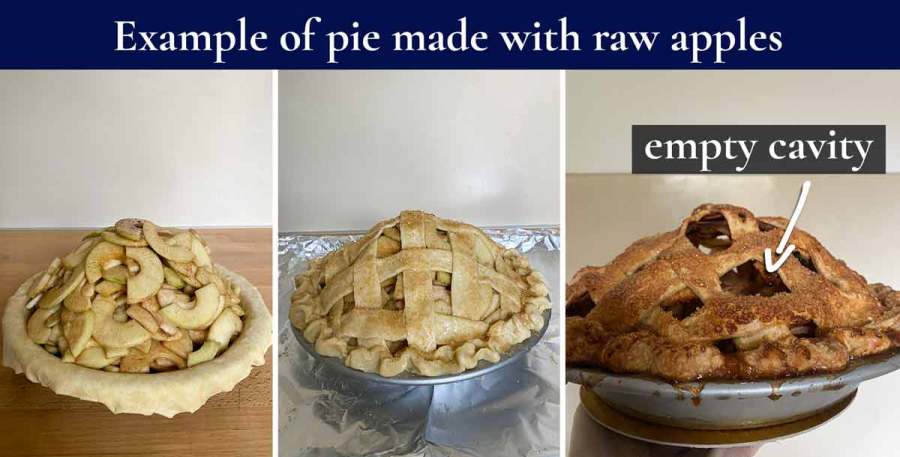 Giant mound of raw apples cooks down, leaving an empty cavity under the pie lid. No!
Reading back over my list, you must think I’m a bit of a whiny, difficult-to-please person. 😂 It’s not that at all! People in my life know very well I am far from a hoity-toity type.
For me, the thing about Apple Pie is that it’s not a quick recipe especially when you take the time to make the crust from scratch. So the end result needs to be worth the effort, ie. flawless!
The other thing – and this is the clincher – is that pretty much all of the issues I listed above boil down to how the filling is dealt with. A filling made with raw apples for instance is a very common approach but leads to all sorts of problems like those I mentioned.
If we can just fix the filling, we’re laughing.
The solution: Bake the apples
 Baking apple slices prior to filling the pie ended up being the easy solution to issues I had with previous pie recipes. Bonus: better apple flavour!
The solution to my gripes turned out to be simple: Bake the apples. It’s as easy as that.
Here’s why it works:
-
The apples cook evenly
-
The apple juices can be reduced to a syrup so it’s not runny and doesn’t soak the base
-
The apples are cooked down first so you don’t end up with a giant empty pie-lid cavity
-
It’s far easier than stovetop-cooking your apples. Stirring a tonne of apple slices is not fun, plus they don’t really cook evenly.
-
And … better flavour!
Here’s the proof!
And here’s photo evidence of the difference baking the apples makes:
Exhibit A: Crispy base
Here are a couple of photos to show you the crispy base.
 Close up photo showing fully cooked crispy base of Apple Pie
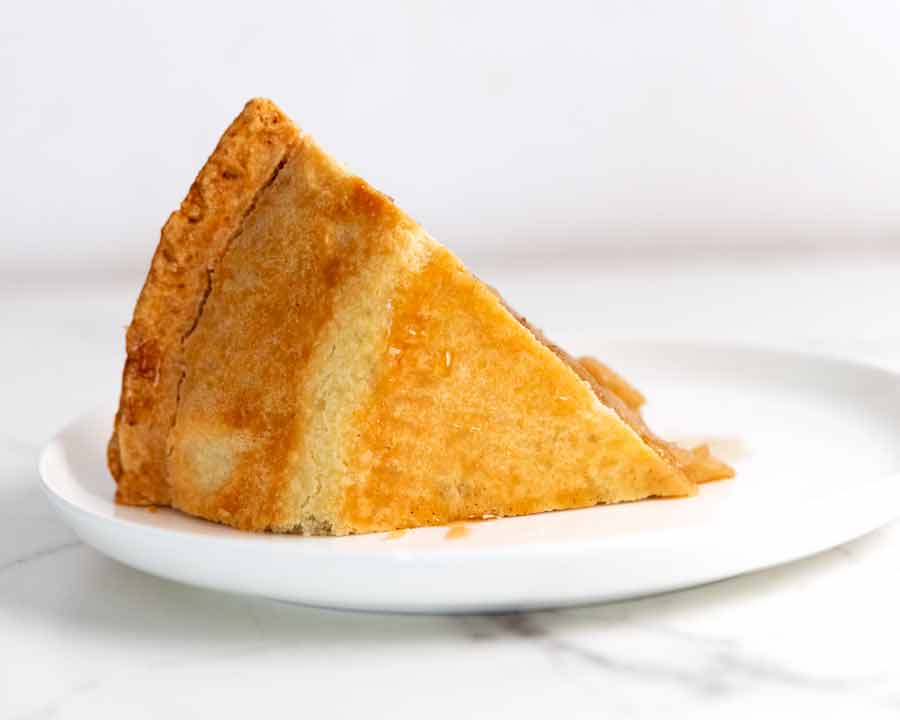 Photo showing fully cooked underside of Apple Pie
Exhibit B: No giant empty cavity under the lid
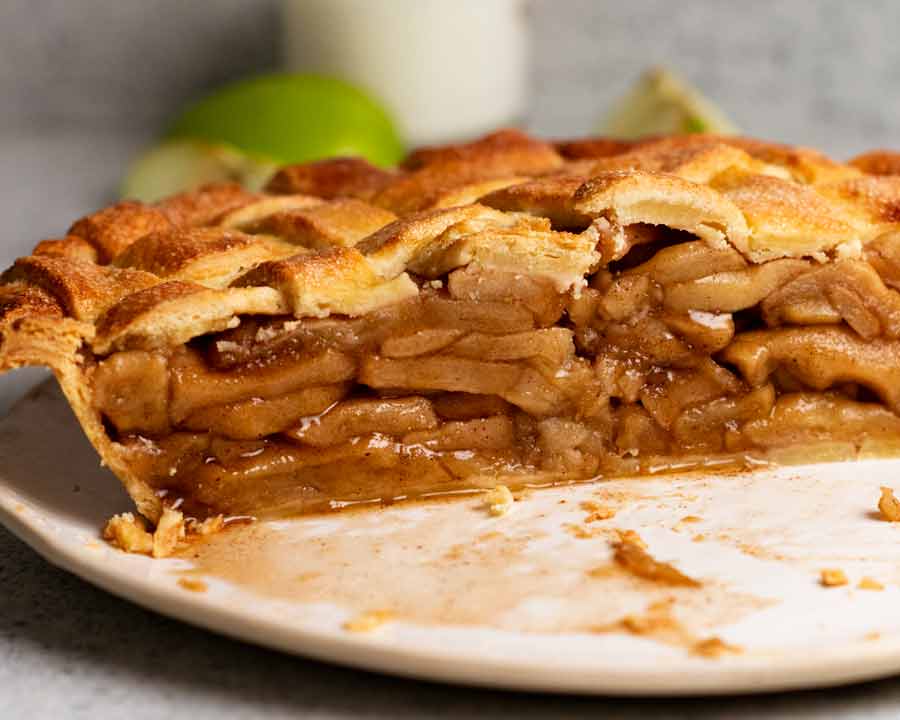
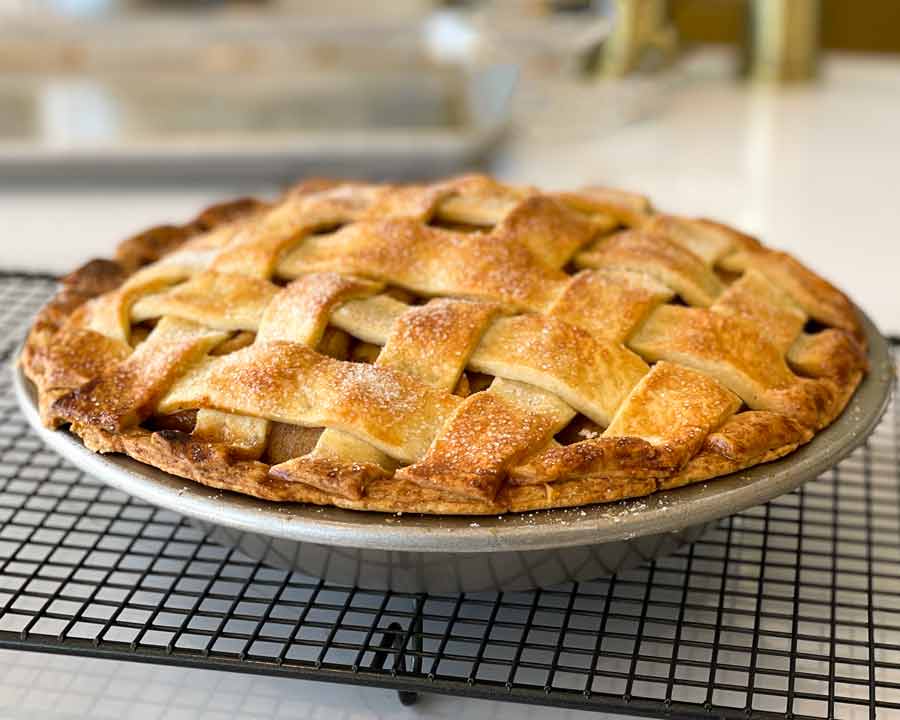
And this is what the pie looks like straight out of the oven – Flat lattice, and the inside filled to the brim with apples.
OK! Ready to see how to make my Apple Pie?? Let’s do this!
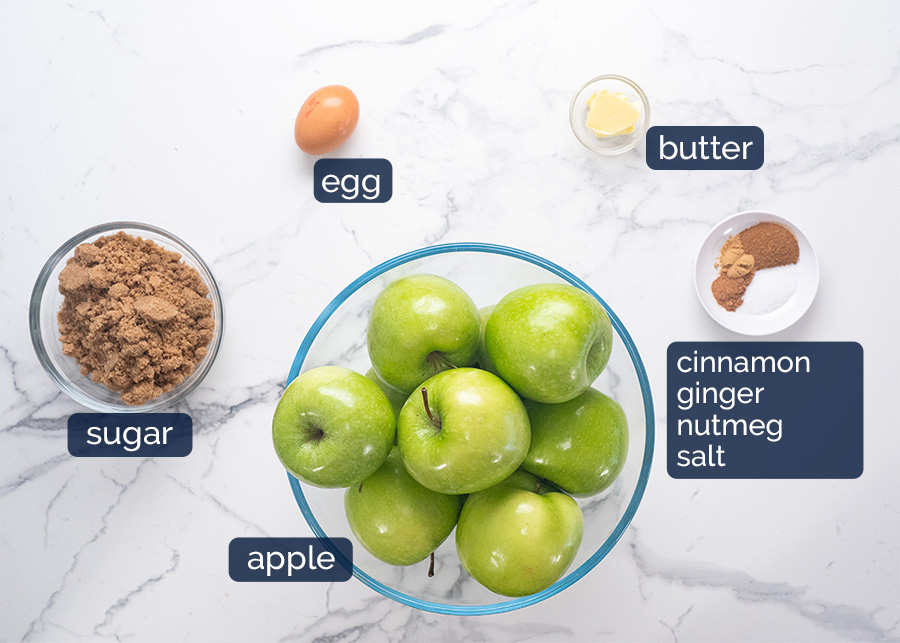
What you need to make Apple Pie filling
Here’s what you need to make the Apple Pie filling. (PS. The egg is out of place, it’s for brushing the pastry!).
-
Granny Smith apples – There’s plenty of opinions out there about the best apples for Apple Pie. But for me, Granny Smith is The One, for its tartness and ability to hold its shaped once cooked. This is key to avoiding a mushy filling!
-
Brown sugar – My choice of sugar for caramelly sweetness. I use 1 cup of brown sugar which, to me, provides the perfect level of sweet-but-not-too-sweet.
-
Apple Pie spices – Cinnamon, ginger and nutmeg. Mix up your own for better flavour control instead of using a pre-made mix!
-
Butter – Just a dab, for simmering with the apple juices on the tray to make a syrup for the Apple Pie filling.
-
Salt – Just a touch, to bring out the other flavours. It doesn’t make it salty at all.
-
Egg – Used to brush the pie lid to make it a beautiful and shiny golden brown!
Apple Pie crust
The classic crust used for apple pie is shortcrust and that’s what I use. My recipe is very standard (flour, butter, salt, sugar, water). However the one thing I should probably address is the debate over butter vs vegetable shortening.
Advocates of vegetable shortening (which is a type of fat made from vegetable oil) love how it makes shortcrust pastry ultra-crumbly and flaky.
I have no issues with vegetable shortening per se, except that it is tasteless. So while shortcrust pastry made with butter may not be quite as flaky, it is still flaky enough to me and more importantly, is a whole lot tastier to eat.
And if your mind is going straight to “why not use a combination”?, you must think like me because I tried that too. But I just found it still lacked flavour even using a 50/50 mix.
So, all-butter shortcrust it is! Recipe here.
PS. Also – I use a food processor. Because I have hot little hands which melt the little bits of butter as I work with the dough. Food processor = exactly the same results as handmade + superior flakiness + SPEEDIER.
 PS Doing the lattice is EASY. You’ll see below!
How to make Apple Pie
Heads up – there’s a lot of information here because I explain there why and also provide tutorial information so even first-timers can have the confidence to nail the Great Apple Pie!
If you’re a pro, just skip on ahead to the recipe or the how-to video, or to Dozer. 😂 For everyone else, come along for the ride.
Game plan: My Apple Pie workflow
-
Make shortcrust pastry.
-
While the pastry-lined pie tin is in the freezer for 2 hours, bake the apple slices.
-
While the apple is baking, roll out the pie lid and cut the lattice strips, then refrigerate.
-
While the apple slices are cooling, blind bake the pastry and reduce the apple juices to make the syrup.
-
Assemble the pie and bake the whole she-bang!
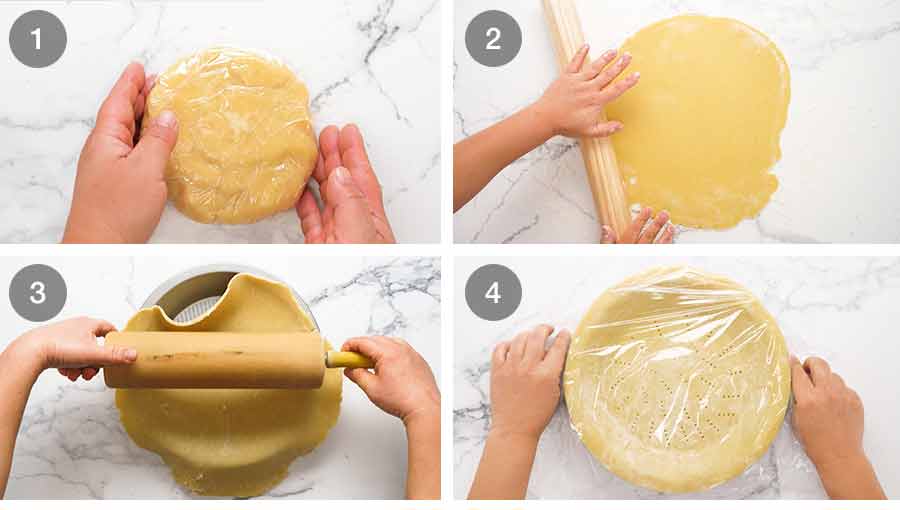
1. Prepare the pie crust
-
Shortcrust dough – Make a double batch of my (easy!) shortcrust pastry dough. Form two separate discs, wrap and chill for 1 hour in the fridge.
-
Roll out – Unwrap one ball of dough and roll out on a lightly floured work surface into a round that is about 5 mm / 1/5″ thick (not too thin, it needs to be sturdy enough for lots of juicy filling!)
-
Line pie tin – I use a 23 cm / 9″ metal pie tin (not a deep dish). Metal is best. You just can’t get a proper crispy base with a glass or ceramic pie tin – we’ve tried. This is the tin I own, and here is a better value one but I haven’t tried it. (Note: There are not affiliate links.)
To line the pie tin, roll the pastry off the work surface on to the rolling pin, then unroll it over the pie tin. This is not just the simplest technique to transfer the pastry (no tearing!) but you will also avoid stretching the pastry which then causes the crust to shrink when it bakes.
Drape the pastry into the pie tin, taking care not to stretch it (as noted above).
-
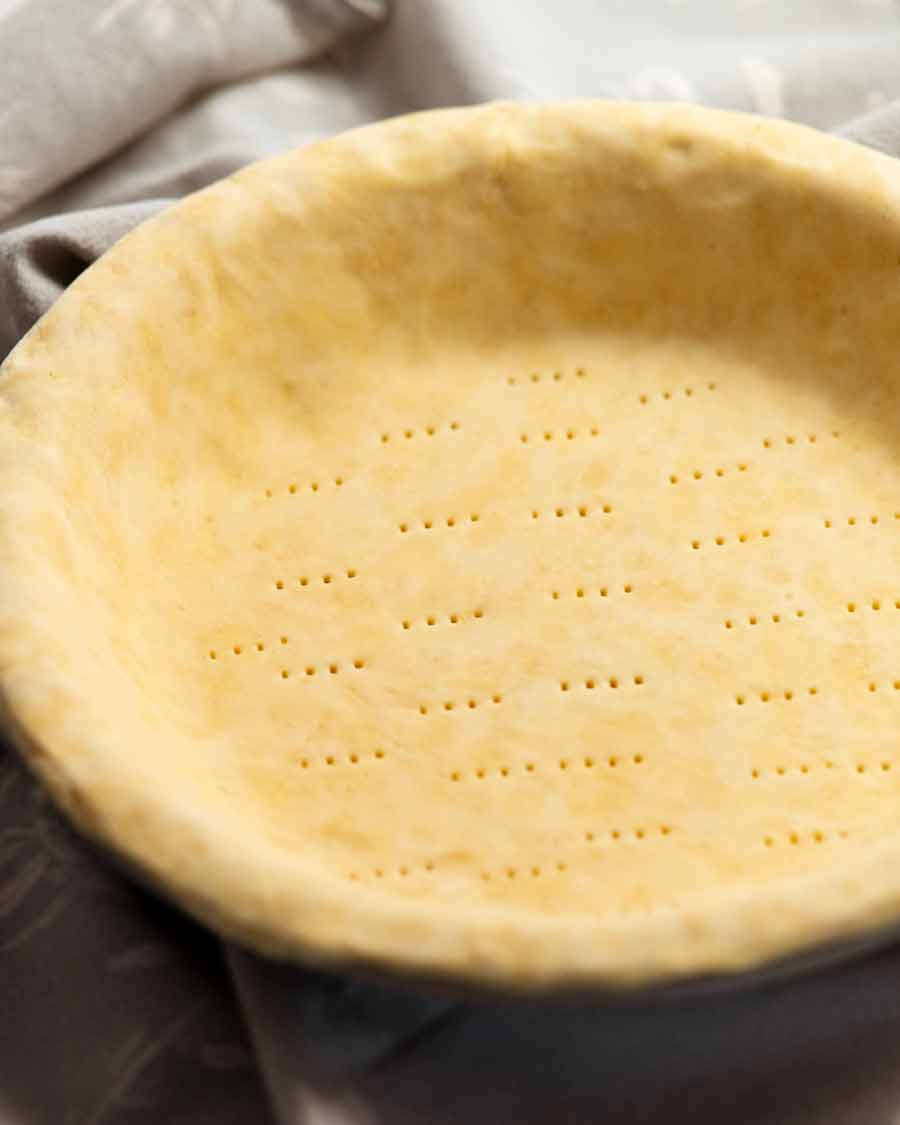
Prick pastry and freeze – Use a fork to gently prick the base around 30 times (don’t go all the way through). This helps prevent the base from bubbling up when baking which can cause pie juice leakages.
Wrap the pie tin in cling wrap and freeze for 2 hours. You can actually even leave it there frozen for up to 1 month (probably longer, I just haven’t tried).
Freezing pastry is a terrific technique I learned from my French pastry chef teacher Jennifer Pogmore (she’s based in France and we work remotely together!) Baking a pastry from frozen results in basically zero pastry shrinkage – and excellent pro tip!
It’s extra-important to avoid pie crusts shrinking with a fully-loaded apple pie because it can lead to a broken crust when the filled pie is baked! Why? Well, imagine all the weight of all that filling pressing against a crust that has shrunk away and is no longer reinforced by the pie tin walls. It can crack like a burst dam. Apple juices seep under the crust which then glues the crust to the pie tin … disaster! (Clearly you can tell I speak from experience 😂).
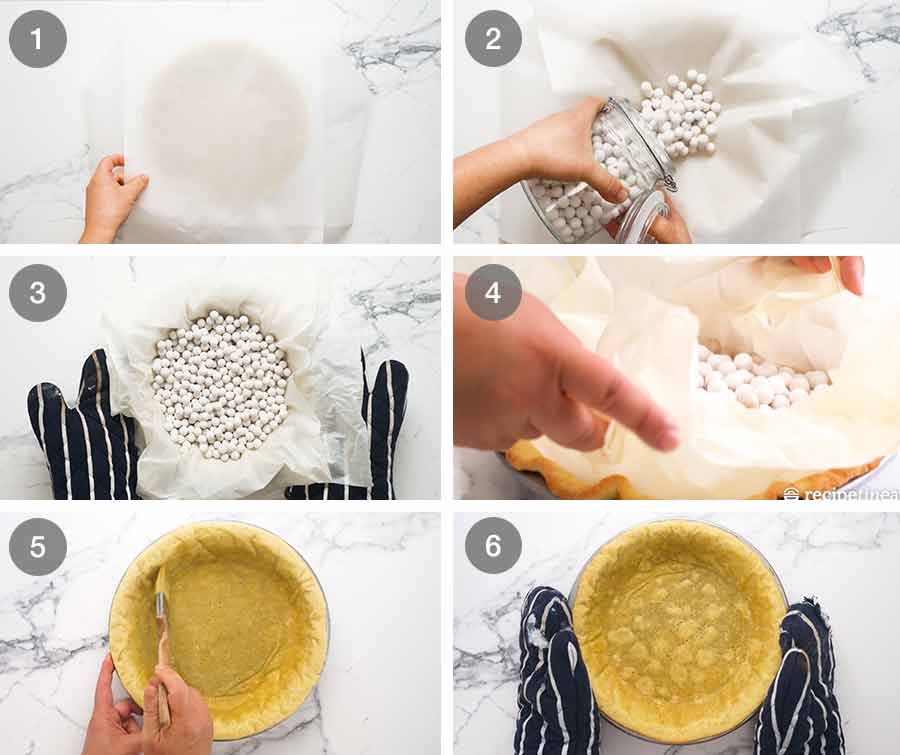
2. Blind bake the crust
Blind baking (par baking) is key to ensure the crust is not just crispy, but also fully cooked. We tried numerous variations without blind baking the crust. The results were mixed. For some, the base was soggy, and for other attempts, either the base and or/sides were not fully cooked.
Conclusion: blind baking is essential! Here’s how to do it.
-
Cover with paper – Cover the frozen pie crust with two overlapping large sheets of baking/parchment paper arranged in a “X”. Excess paper hanging over the edges is necessary to protect the pie rim from browning too fast as well as having plenty to grip so you can remove the hot baking beads safely (see below).
-
Baking beads – Fill with baking beads until level to the rim. These beads weigh down the base as well as press the pastry against the sides of the pie tin so it prevents the pastry from shrinking. (Read section above for why pastry shrinkage is undesirable for Apple Pie!)
No baking beads? Use uncooked rice or dried beans. Keep for re-use indefinitely.
-
Bake for 25 minutes at 200°C / 400°F (180°C fan).
-
Remove the baking beads using the paper overhang to lift out the paper and transfer them to a heatproof bowl.
-
Egg wash – Brush the base and sides (but not rim) lightly with whisked egg. This is a crispy base insurance step. When the egg cooks, it forms a thin water-resistant “barrier” to help prevent the pastry from absorbing the juices.
-
Bake uncovered for a further 5 minutes then remove from oven. The pie crust should be light golden and look fully cooked.
Leave to cool for 15 minutes before filling with the Apple Pie Filling. This is another crispy base insurance step, ie. hot pastry absorbs liquid more.
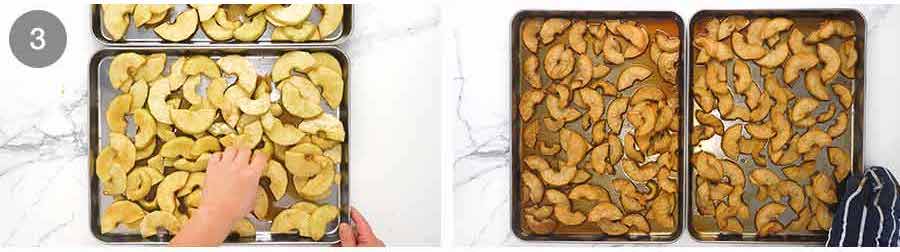
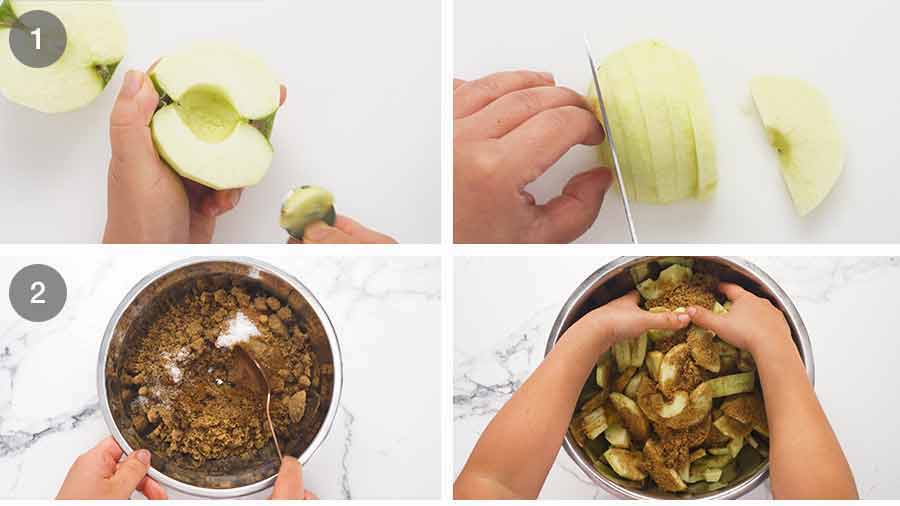
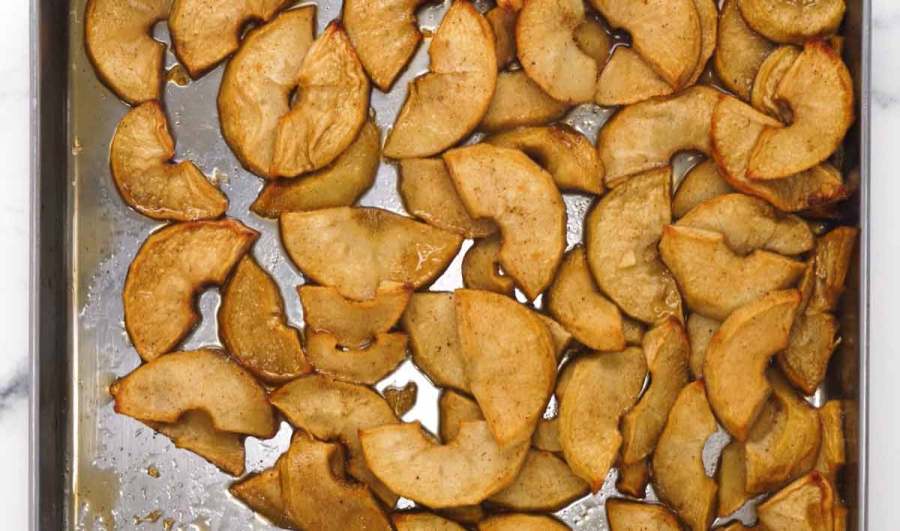
3. Baking apple slices
Baking the apple slices is the key step for the Perfect Apple Pie. Read the reasons why in the section above!
-
Slice apples – Core the apples using your chosen method. If you’re an apple-cooking fiend like myself, you’ll have an apple corer. If not, you can just core the apples using whatever method best works for you.
Peel then halve the apples. Now place them flat side-down and cut into 1cm / 0.4″ thick slices. Try to cut them as evenly as possible so they cook evenly.
-
Toss with spices and sugar – Put the apple slices in a large bowl. Mix the sugar and spices in a separate small bowl (I know you just want to dump them straight in but then the spices don’t disperse evenly). Now sprinkle the mixture over the apple slices and use your hands to toss well, separating the apple slices as needed so they are evenly coated.
-
Bake – Spread across 2 trays and bake at 180°C/350°F (160°C fan) until the apples are tender but not mushy. The bake time will vary from 15 minutes to 40 minutes. An interesting discovery when we were testing this recipe as Granny Smith apples here in Australia take 40 minutes whereas in France, they take just 15 minutes. Perhaps this is due to local apple variations? Amazing!
A simple lesson learned: Check your apple doneness early. Easy!
What the done apples should be like: The apple slices should be tender and offer no resistance when you pierce them with a knife. However, you don’t want them mushy. They will be a bit delicate when hot out of the oven but will firm up as they cool. They won’t cook much more once inside the pie, that step is more about melding everything together to become a juicy pie filling.
-
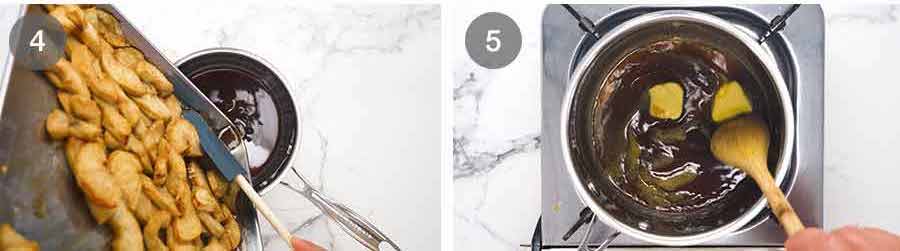
Apple juices – Drain the apple juices on the trays into a saucepan. No need to be fussy here, just tilt the tray and use a spatula to hold back the apple slices while you drain off as much as you can. If there’s some left on the tray that’s ok – we will just add it later.
You should have around 1/2 cup of juices. Some days though I have less, other days I have more. It doesn’t matter because we are reducing it in the next step to a specific amount.
-
Make syrup – Add the butter to the apple juices and simmer on low heat until it reduces to 1/3 cup (80 ml) and becomes a syrupy consistency. It might take 1 minute if you only had around 1/3 cup, or 5 minutes if you started with 1/2 cup or more.
Reducing the apple juices to a syrup serves 2 purposes. Firstly, we are not wasting free flavour – never, we are getting apple flavour to the max! It made me want to cry every time I read an Apple Pie recipe that directed people to discard apple juices.
Secondly, by reducing the apple juices to a thicker syrup, it will cling to the apple pieces better and will not soak into the base as much. Which means – yup, you guessed it – crispy base!
Once the syrup is ready, set aside to cool.
-
Cool apples – Meanwhile, also set the cooked apple slices aside to cool. This will make them less delicate to handle and also ensures they don’t overcook into mush when baked inside the pie in the 45 minute cook time required for the pastry lid to cook.
4. Fill the pie
OK! We’re on the home stretch here to the best part: cooking but more importantly, EATING IT!!!
-
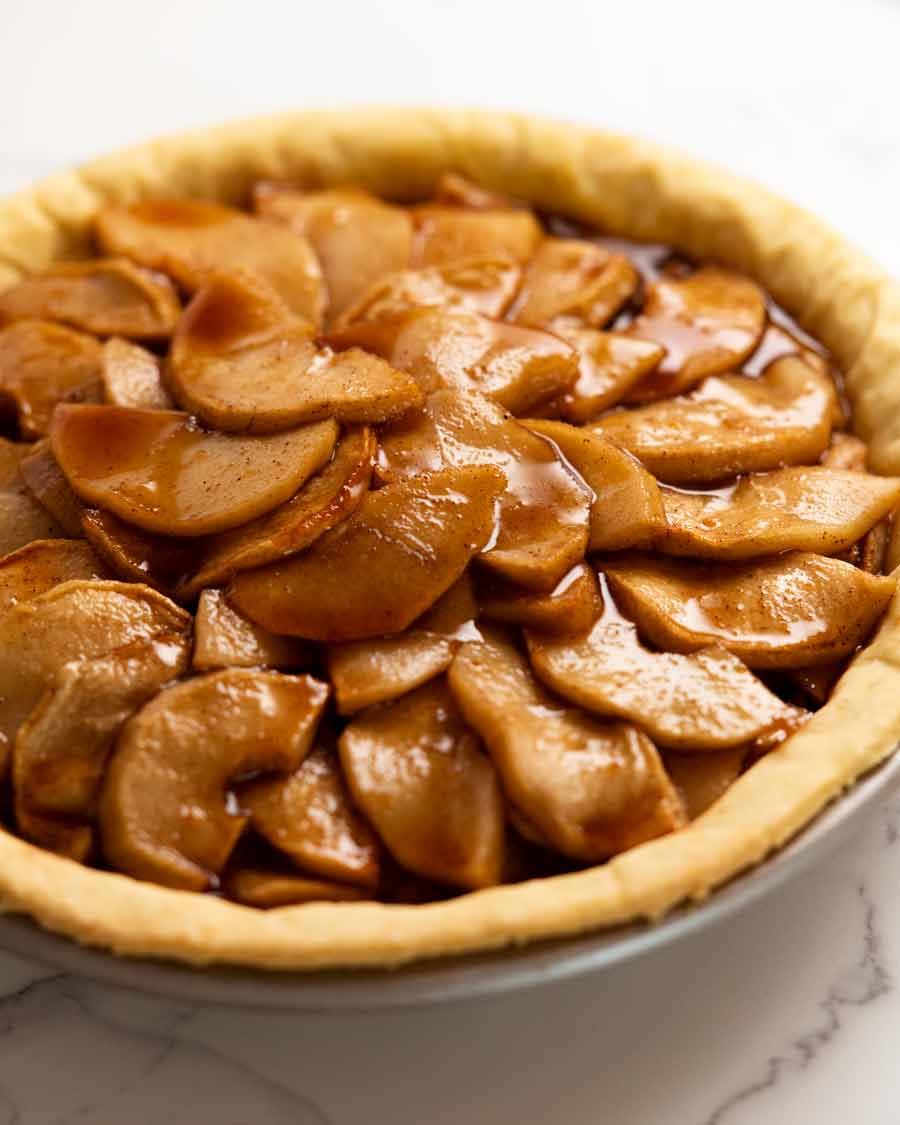
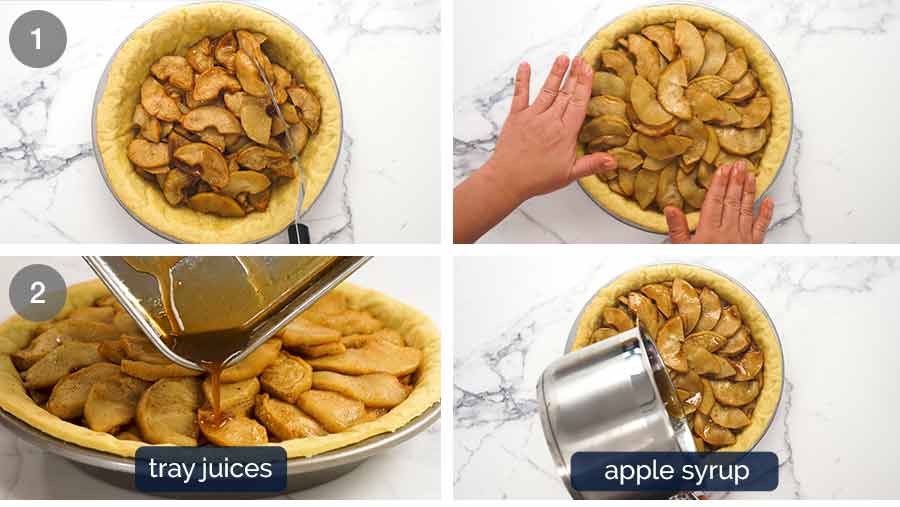
Fill the pie crust with 2/3 of the cooled apple slices. I find using a spatula or egg flip to scoop them up is the best way to handle them. Place them in the pie crust and press down lightly to remove air pockets.
With the remaining apple, firstly arrange some in a heap in the centre to create a slight mound. Then keep layering the rest of the apple slices over the top of the filling. You can see in my photo I’ve placed them slightly overlapping in a neat arrangement. You don’t need to do that!
-
Pour over the apple syrup and any residual juices left on the tray.
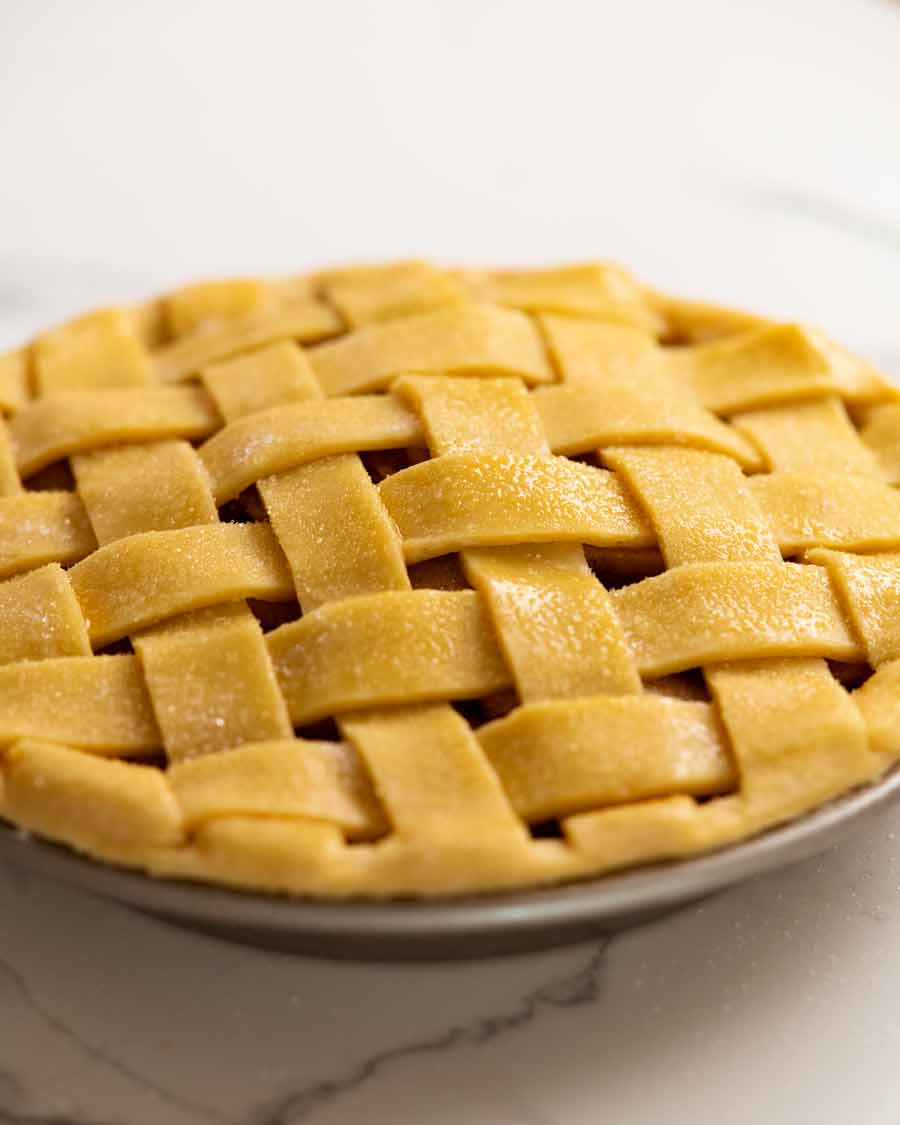
5. Lattice tutorial!
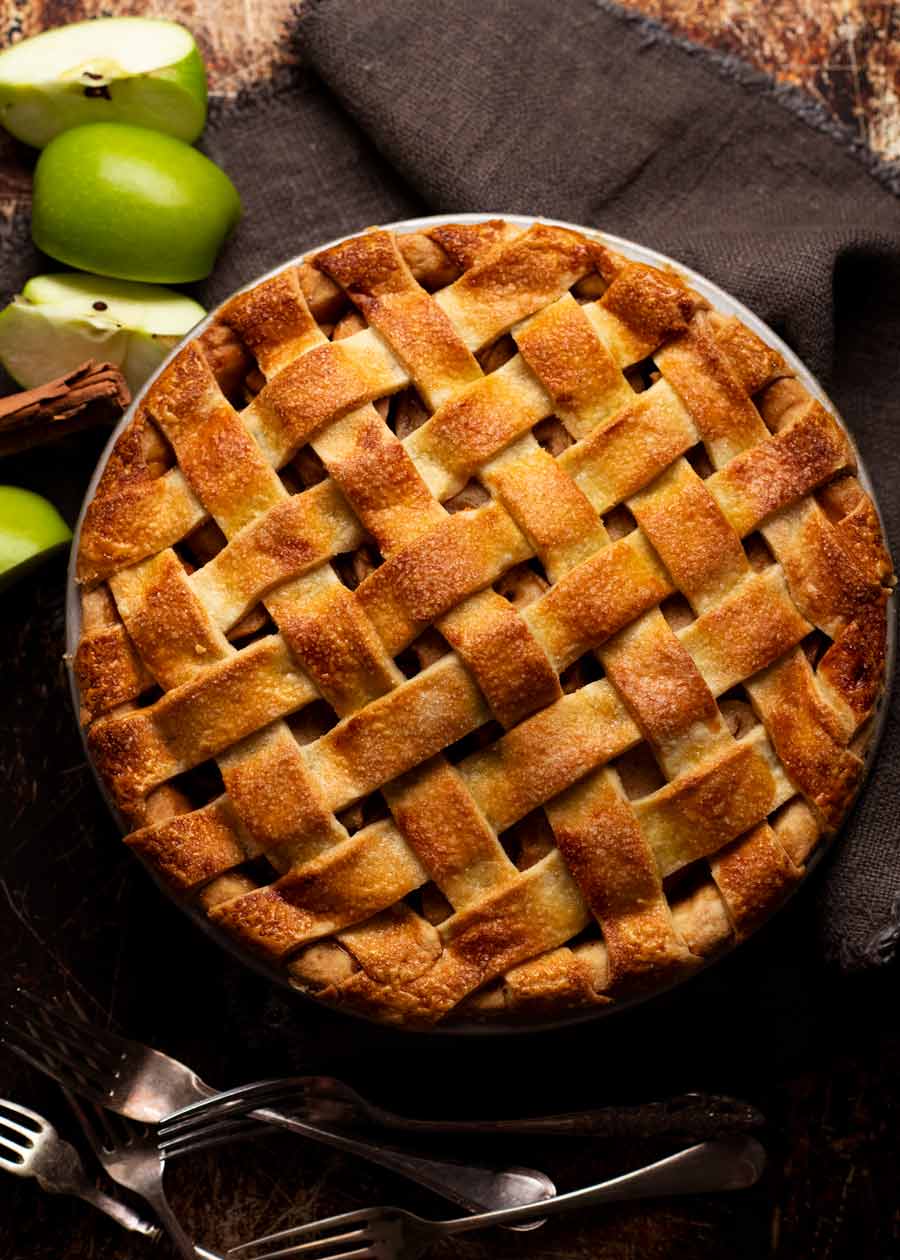
OK! I know we all want our Apple Pies to sport the neat, criss-cross woven pastry lid like we see in every classic Apple Pie photo ever. So here’s a little pie lattice tutorial. I promise it’s not hard!
-
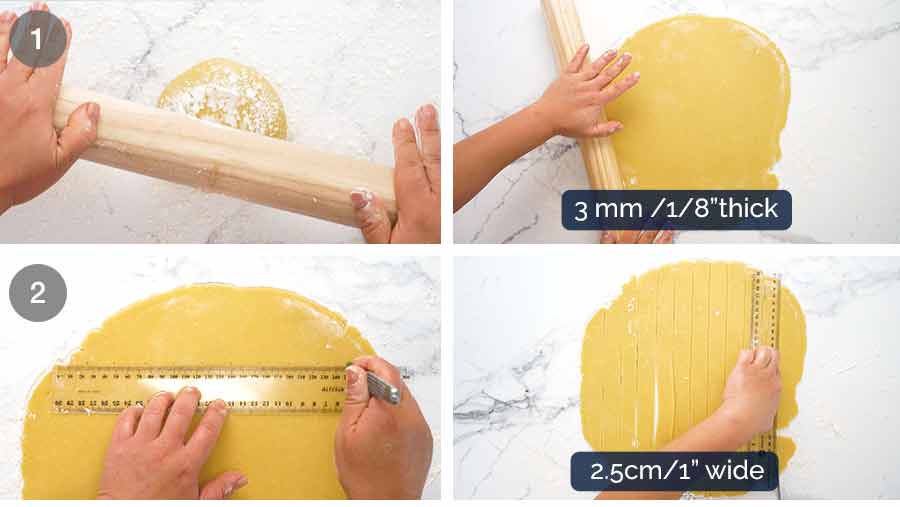
Roll out the pie lid dough on a lightly floured work surface to 3 mm / 1/8″ thick. You don’t want it too thick or it will not cook through by the time the lid surface is a beautiful golden colour.
-
Cut 12 x 2.5cm / 1″ strips. I use a ruler and a small sharp knife that I run along the ruler to cut the strips.
I try to do this step while the apples are baking, returning the strips to the fridge (covered in cling wrap) until required.
-
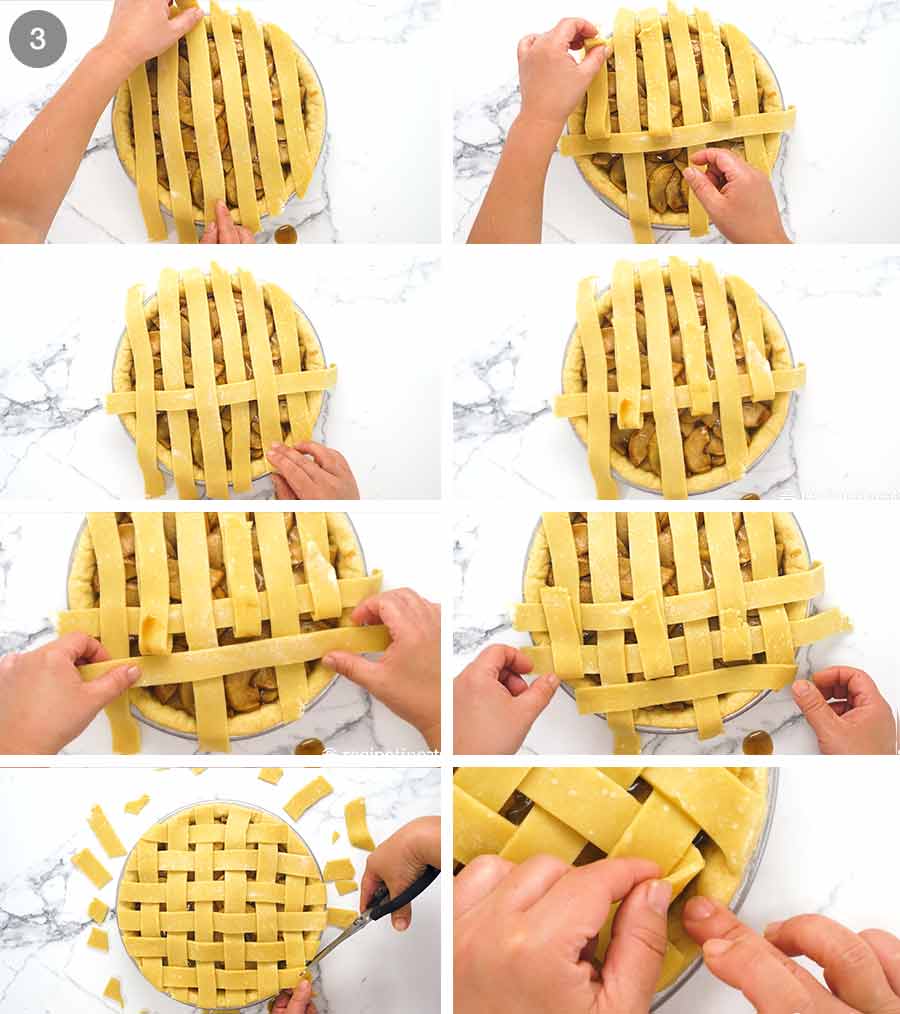
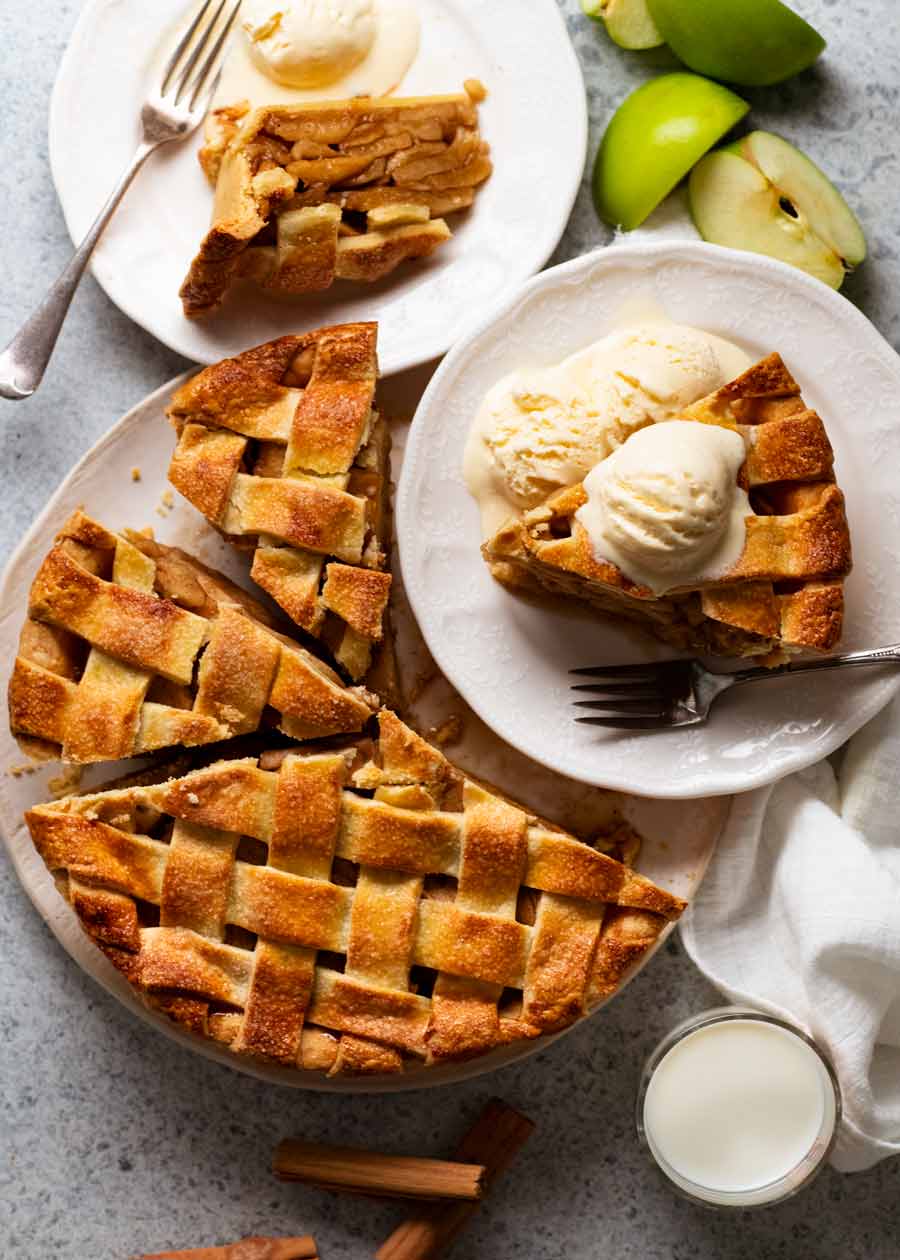
Forming the lattice – Place 6 pastry strips in the same direction on top of the filling, evenly spaced apart.
Fold back every 2nd strip to halfway. Place a strip of pastry perpendicular to the laid strips, right up the strips are folded. Now unfold the strips to return them to how they were. Next, fold up the alternative strips you didn’t fold first time around, and place another strip across the pie in the same way. Repeat with one more strip. Rotate the pie and repeat with the remaining 3 strips to do the other half of the pie. Obviously, this is a good time to watch the video to see how it’s done!
Trim excess strip pastry using scissors or a small sharp knife.
Seal by using water and pressing the strips against the crust to adhere. I find it easiest just to use my finger.
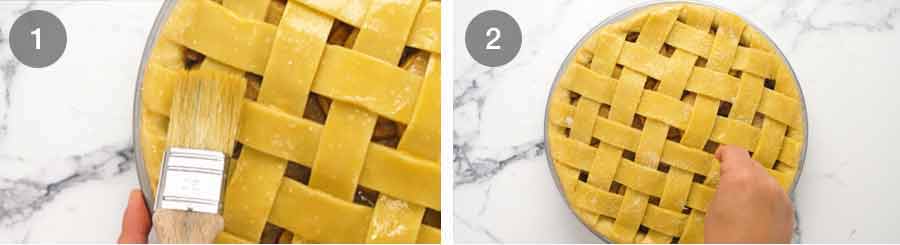
6. Bake it!
-
Egg wash – Brush the lattice with egg wash, taking care to avoid the cooked pie rim (else it will get overly brown). Also ensure you don’t end up with pools of egg in the lattice joins, which will be unsightly.
-
Sugar sprinkle – Then sprinkle with sugar. We use regular sugar and not caster/superfine so we’ll have lovely sparkly sugar crystals bejewelling our lid.

-
Bake for 45 minutes until the pastry is golden and you see the apple juices bubbling inside.
-
Cool – Fully cool for at least 3 hours before cutting to serve. If you want to serve after this, you’ll need to cut and serve it out of the pie tin because the pie will not be stable enough to turn out whole. The slices will also be a little rustic. 🙂 Such is the nature of freshly made pies!
Neat slices – If you would prefer to serve neater slices as pictured, just refrigerate the pie overnight. It will firm up and become sturdy enough to turn out onto a plate and cut neat slices. Leaving overnight also gives the pie filling flavours a chance to meld together even more.
To then reheat, cover with foil and reheat in the oven (10 minutes at 180°C/350°F) or use the microwave for a speedy option (1 minute). And yes, the base stays crisp!
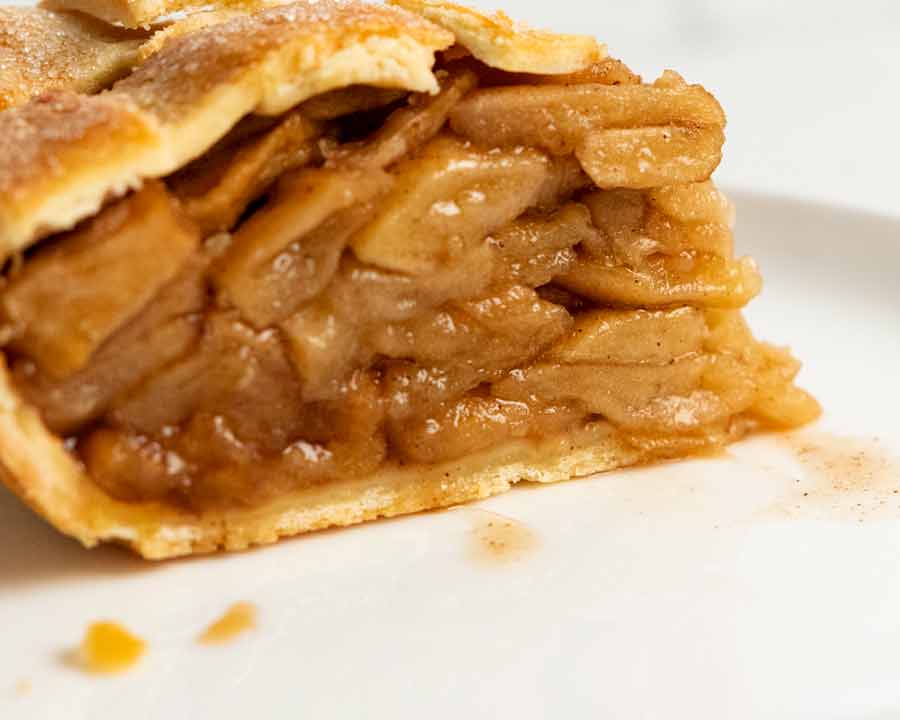
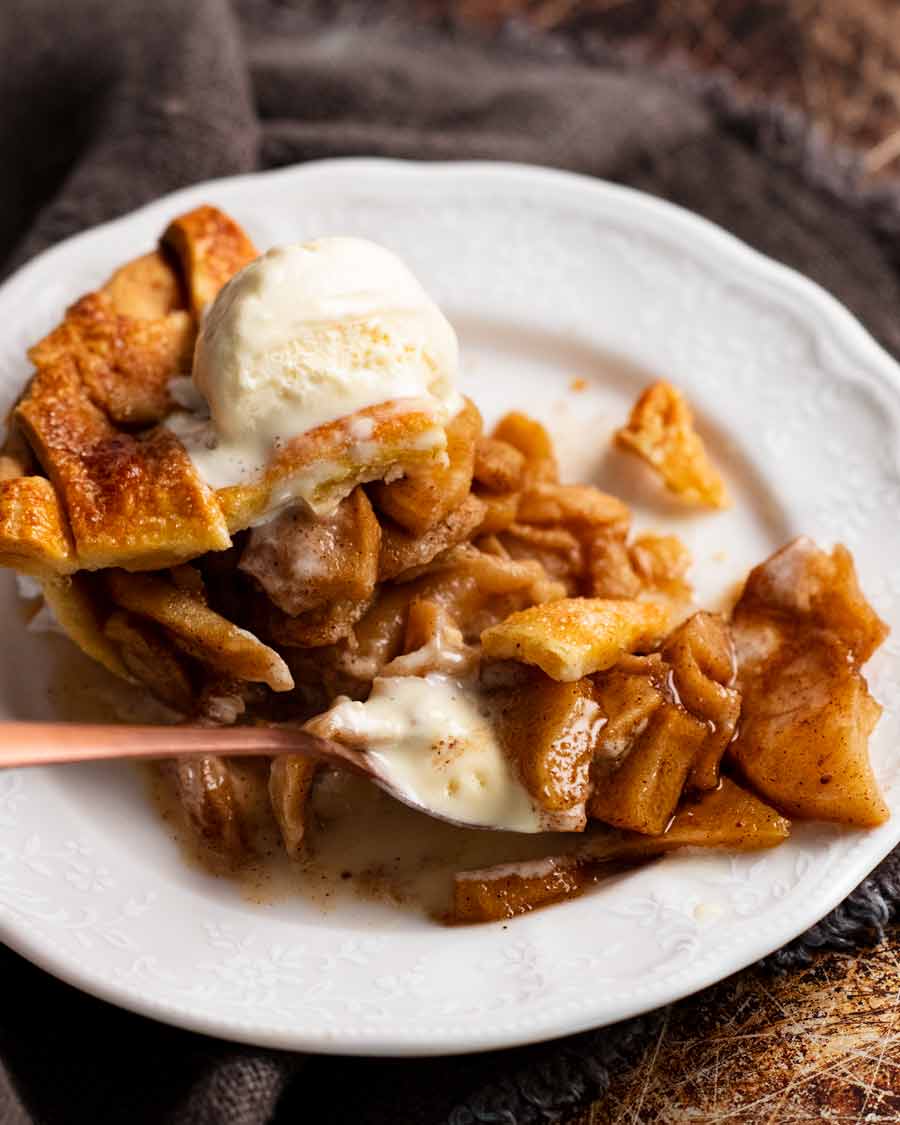
Here’s a close up of the cut apple pie after it’s rested overnight and has been reheated in the oven. It’s still nice and juicy, and cuts neatly.

Serving without vanilla ice cream is not even an option. It goes without saying – right??!! Maybe with cream too – or would that take it over the top?
And there you have it. My perfect Apple Pie! A strange time to share it perhaps, heading into Australian summer. But she cannot always choose when she will finally be happy with a recipe. Still, she is chuffed that she managed to squeeze this in just before Thanksgiving – enjoy, my American friends! – Nagi x
PS. I don’t know why I’m writing about myself in the 3rd person. Note to self: come back and fix this!
Watch how to make it
Recipe
Hungry for more? Subscribe to my newsletter and follow along on Facebook, Pinterest and Instagram for all of the latest updates.
My Perfect Apple Pie
Prep:
1
hr
Cook:
2
hrs
Cooling – minimum:
3
hrs
Dessert, Pie
Western
from
votes
Servings
10
-12
Tap or hover to scale
Recipe video above. Basic Apple Pie recipes just call for piling raw apples in an uncooked pie crust. It will work … but the crust will have raw patches, be soggy, the apples unevenly cooked and you’ll have a giant empty cavity under the pie lid. Hmm.
If, like me, that’s not good enough for you, make my Perfect Apple Pie! The trick: bake the apples for the filling first and blind bake your crust. Result? Superior flavour, perfectly cooked apple filling, a crispy base and no unsightly gaping cave under your pie lid!
NOTE: Saddened to see mixed reviews where the wrong apple types has been used. This recipe is made for Granny Smith Apples! Other apples are not juicy enough or too soft. Please follow the recipe!
Ingredients
-
▢
2
x
homemade shortcrust pastrythis recipe , or store bought (Note 1)
-
▢
1
egg
, lightly whisked
-
▢
2
tsp
white sugar
(granulate/regular, not caster/superfine), optional (Note 2)
Apple pie filling:
-
▢
2kg/ 4 lb
Granny Smith apples
, cored, peeled, halved, cut into 1 cm / 1/3″ thick slices. (Note 3)
-
▢
1
cup
brown sugar
-
▢
1
tsp
ground cinnamon
-
▢
1/2
tsp
ground ginger
-
▢
1/4
tsp
ground nutmeg
-
▢
3/4
tsp
cooking/kosher salt
-
▢
1
tsp
unsalted butter
Serving
-
▢
Vanilla ice cream, cream
Instructions
Pie crust:
- Shortcrust: Make a double batch of my
Make a double batch of my shortcrust pastry recipe . Form the dough discs, wrap and refrigerate per the recipe.
- Line tin: Roll out one dough just large enough to fit a 23cm/9″ metal pie tin, following directions in the
Roll out one dough just large enough to fit a 23cm/9″ metal pie tin, following directions in the shortcrust recipe . You want the base relatively thick so it’s sturdy. Trim off excess pastry, prick the base 30 times with a fork (don’t pierce through).
-
Freeze (Note 4): Cover with cling wrap and freeze for 2 hours.
-
While crust is freezing, make apple filling. Then continue with pie crust steps.
-
Preheat oven to 200°C / 400°F (180°C fan).
-
Blind bake (Note 5): Place two large sheets of baking/parchment paper in a “X” over the pie tin then fill with baking beads (Note 4). Bake 25 minutes.
-
Egg wash (Note 5): Remove from oven. Use paper excess to remove beads into a bowl. Brush base and sides (not rim) lightly with whisked egg. Return crust to oven for 5 minutes.
-
Cool: Crust should be light golden and look fully cooked. Cool 15 minutes before filling.
Lattice (Note 6 for full lid):
-
Remove remaining dough from fridge 30 minutes prior. Roll out to 3 mm / 1/8″ thick and cut into 12 x 2.5cm/1″ strips. Transfer to board, cover with cling wrap and refrigerate until required.
Apple Pie Filling:
-
Preheat oven to 180°C / 350°F (160°C fan).
-
Spice mix: Mix the sugar, cinnamon, ginger, nutmeg and salt in a bowl.
-
Toss: In a large bowl, sprinkle spice mix over apple slices. Toss well with hands, separating pieces that are stuck together.
-
Bake: Spread across 2 large trays. Bake until soft but still holding form – check first at 15 min, and every 5 mins thereafter (mine take 40 min – Note 7). Do not stir or rotate trays.
-
Drain off juices: Remove trays from oven. Using a spatula to hold the apples back, pour apple juices into a saucepan (drain off what you can, you don’t need every drop).
-
Cool apple: Leave apple slices to cool on the tray, about 15 minutes.
-
Apple syrup: Add butter to apple juice saucepan and simmer on low heat until it reduces to 1/3 cup (80 ml), becoming syrupy. This might take 1 minute if you didn’t start with much juices, or 3 – 5 minutes if you started with 1/2 cup or more juices. Remove from stove and let cool.
Assemble and bake:
-
Turn oven up to 200°C/400°F (180°C fan).
-
Fill: Use a spatula or egg flip to scoop up apple slices. Fill the pie crust with 2/3 of the apples, gently pressing out air pockets. Then arrange the remaining apples on top so they mound slightly at the centre. Pour apple syrup over the slices and any residual juices from the baking trays.
-
Pastry lattice or lid: Top with pastry lattice – see in post for my method. Trim excess, and press to adhere on to pie crust rim using water to seal. Brush lattice with egg wash (avoid the pie rim else it will over-brown there), ensuring you don’t get pools of egg in the joins. Sprinkle with sugar.
-
Bake 45 minutes or until the pastry is golden and you see the syrup bubbling through the lattice.
-
Serving fresh: Cool at least 3 hours before cutting to serve!
-
Option for neat slices: After cooling, refrigerate overnight. Turn pie out of pie dish (it’s sturdy enough once cooled). Then you can cut neat slices. Place on a tray, cover with foil and reheat for 10 minutes in a 180°C/350°F oven (or microwave in emergency!).
-
In either case serve with vanilla ice cream, always!
Recipe Notes:
MY WORKFLOW:
While pastry lined pie tin is in the freezer, bake apples. Meanwhile, roll out lattice. While baked apples are cooling, blind bake pie crust and reduce apple syrup. Then assemble pie and bake!
1. Crust – If using store-bought pie crust, follow packet directions.
2. Granny Smith is my choice for apple pie for its tart flavour which plays so well with the sugar and spices. Also because it holds its form well when cooked (rather than turning into baby food).
PLEASE do not make this pie with other types of apples, I cannot guarantee outcome as some varieties are not juicy enough (= dry filling) or are too soft!
3. Sugar for a sparkling crust. Optional.
4. Freezing prevents pastry shrinkage. It really works and is worth doing. A neat trick taught to me by my French pastry chef teacher
prevents pastry shrinkage. It really works and is worth doing. A neat trick taught to me by my French pastry chef teacher Jennifer Pogmore . Freeze overnight or up to 1 month! This step is key for apple pie because crust shrinkage = high risk of breakage once filled (because crust is no longer pressed again pie tin wall for support).
Baking beads also helps prevent pastry shrinkage. Don’t have any? Use uncooked rice grains or dried beans. Save for re-use another time!
5. Par baking the crust is key for ensuring the pie crust is fully cooked and crisp. If you start with raw dough, you will end up with some raw patches whether on the base or sides, or both, and/or soggy base.
Egg wash on blind baked crust also helps keep the base crispy as it forms a bit of a water-resistant barrier.
6. Full pie lid option (instead of lattice) – Roll out pastry and don’t cut strips. Seal to rim using water, cut 2.5cm/1″ cross in centre to allow steam to escape. Brush with egg and sprinkle with sugar. Bake per recipe.
7. Apple baking time – Start checking your apples at the 15 minute mark as we discovered during testing that the same variety of apples differ drastically in cook times. In France (where Jennifer resides), it only takes 15 minutes. Mine take 40 minutes. So just start checking early! Note: Apple does not soften much more once inside the pie crust so get the texture right during this step.
8. Recipe credits – Many thanks to my French pastry chef teacher
Many thanks to my French pastry chef teacher Jennifer Pogmore and RecipeTin’s Chef JB for their assistance and expertise to bring my vision of the perfect Apple Pie to life. We did it!!!
9. Leftover apple pie will keep for up to 4 days in the fridge though it is at its prime in the first 24 hours after baking. Freezing – I haven’t tried. When I get a chanace I will try then update this note!
10. Nutrition – Pie only without ice cream or cream.
Nutrition Information:
Calories:
474
cal
(24%)
Carbohydrates:
79
g
(26%)
Protein:
5
g
(10%)
Fat:
17
g
(26%)
Saturated Fat:
5
g
(31%)
Polyunsaturated Fat:
2
g
Monounsaturated Fat:
8
g
Trans Fat:
0.02
g
Cholesterol:
17
mg
(6%)
Sodium:
432
mg
(19%)
Potassium:
310
mg
(9%)
Fiber:
6
g
(25%)
Sugar:
43
g
(48%)
Vitamin A:
146
IU
(3%)
Vitamin C:
9
mg
(11%)
Calcium:
46
mg
(5%)
Iron:
2
mg
(11%)
.
Life of Dozer
That time he came to a book signing and he dribbled on one of the books……. 🙀🙀🙀